Bagley Oil Burner
The Bagley Oil Burner
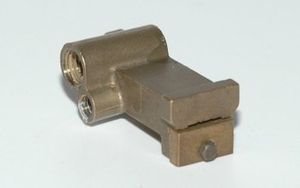
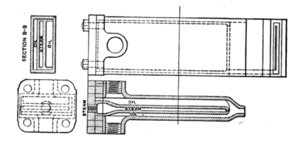
Dick Bagley contributed a great deal to the Live Steam hobby. One of his contributions was the design of a "Sheedy"-style oil burner. He scaled his burner down from the original drawings in the Locomotive Encyclopedia. Dick's oil burner has been used from 1-inch scale locomotives up to 1.5" scale Pacifics. They are easy to install and control.
An article on the Bagley oil burner was published in "Live Steam" magazine, November 1981, page 16.
In addition to the oil burner article, there is another article by Dick Bagley called "Oil Firing a Miniature Locomotive" in the January 1982 issue of "Live Steam".
Availability
Steve Nelson of TMS Trains is offering Bagley Oil Burners. See "Bagley burner reproduction" on Chaski.org.
Installation on #486
The summer months are too hot in Texas to run live steam, so we switch to indoor projects where we can escape the heat (yes I have an air conditioner in my shop!). In the summer of 2012 I determined to upgrade the oil burner in my Allen Mogul #486. It came with a Chet Peterson style round oil burner. It worked ok, but I did not like the way it was mounted. In addition, it tended to leak fuel due to the fact that some of the threads were partially stripped.
I had read about the Bagley burner sold by Will Campbell on Chaski.org. So I called Will to find out more information.
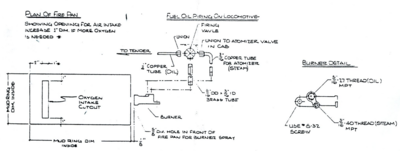
He was a wealth of information. He said the Bagley burners are easy to control. They are cast out of Navy Brass, which is very durable and hard. That way the steam does not "cut" the tiny orifices. There is no machining involved, it is ready to use. It requires a #8 screw to a bracket. The steam line is threaded for 3/16" and the oil line is threaded for 5/16" standard Cole's Models taper threads. The brass needle valve I was already using would be fine for oil control. We talked about air flow on the Mogul. Mine had a plate that covered a one-inch tall gap just under the cab floor that leads into the firebox. He said I should remove the plate covering the gap. This will give it enough air. I mentioned that I would often hear oscillations with the firebox door closed. Will said this means the fire is not getting enough air.
Will warned against running the fire too hot. He said this burner can run a blue (hot) flame if you run it with too much steam pressure and too lean on the oil. He said the stack exhaust should have a slight haze; if totally clear it is too hot. It could melt the boiler. He knew someone who melted their aluminum petticoat by running too hot. The firebox should be "incandescent" yellow.
Steam Pressure Regulation
I found that a common problem with both the Peterson burner and the Bagley burner was trying to control the steam pressure using a standard globe valve. The normal operating pressure range for #486 is 80PSI up to 110PSI, where the regulators pop. This normal pressure variation was reflected in the burner's steam pressure line. The fluctuation caused uneven burning, and often the flame would extinguish from too little or too much atomizer pressure.
Again I returned to the wealth of knowledge on Chaski.org. I learned that other live steamers were using Clippard pressure regulators in the atomizer line. I ordered a pair of MAR-1P-2 regulators, one for installation, and one for the Toolbox of Requirement. The regulators cost $15 each, and I received them within a week.
I tested the newly installed Clippart pressure regulator at HALS Chugga Chugga Chili Fest that same month (yes, it is quite warm in Houston in February), and was very pleased with the results. It is much easier to keep a good flame, and I spent more time looking at the road ahead and less time with my head down in the cab.
I highly recommend atomizer pressure regulation for anyone thinking of switching over to oil. If you like do-it-yourself projects, try building this steam regulator.
Installation and Operation Instructions
Will Campbell graciously allowed the IBLS to publish the installation and operation instructions provided with the Bagley Oil Burner.
Bagley Burner
This burner is identical to those used on big locos with one exception. We have designed in suction to pull the oil out of the tender tank. There is sufficient lift to maintain a good steady fire as the oil level drops and drain the bottom of a tank that is lower than the burner.
We believe you will find that this burner will seldom blow-out. It will stand a fair amount of rough throttle handling (quick opening and closing) with the usual good fire, and much more if you feed oil heavier when you plan to do, such as in switching work and pulling heavy grades. it will take a good slosh of water to kill the fire. A drop or two of water will only make it burp. Large dry pipes the length of the boiler are not recommended as they can fill with condensate (water). And when starting in the forward direction, the surge may flood the turret and your burner. A 3/16 inch line direct out of the steam dome to the atomizer valve will solve that.
Oil
Diesel oil is graded by numbers. Number 1 and 2 are the only ones that are recommended for use in this burner. Number 1 is also known as kerosene and is the best -- yet vey expensive. Number 2 is commonly used, but it contains a lot of solids and silt, hence our suggestions for pipe work.
Pipe Work
Keep it simple and direct. Avoid the use of pipe fittings, ells, etc. Use copper tube with few bends. With an average train (5 or 6 cars) the burner will only use about one gallon of oil an hour, so the flow may not be enough to keep lines clear. An occasional cleaning will be needed. Blow clear with an air gun. A bowl type gaoline filter--as an AC-GF48--with the paper element removed and a wire screen installed, close to the tank outlet is good to catch the dirt and water that will collect in the diesel oil. Pipe tender with 5/16 inch copper tube with stiff hose between engine and tender with as short as possible and little down bend to avoid silt build-up.
the firing valve (oil) should be as close to the burner as possible for quick response and to avoid line surges that can effect the fire.
A plug cock or better a ball valve make good firing valves, as they are self-cleaning and cause the least blockage. They can be opened for short interval, even fully, for better cleaning while running without undue disruption of the fire. (Globe and needle type valves are not recommended as their configuraton tends to block off the flow--then silt and dirt will become blocked in them.) The boiler may be pressured with auxiliary air for steam-up. Even better, a single air connection and two valves connected into blower and atomizer lines, respectively, on the loco will not pressure the boiler.
Burner Mounting
Make up angle bracket to support the burner. Each bracket will be different per loco type. The 3/16 inch atomizer line to the boiler can now be made up and attached to the burner for an air supply. It will be best for ease of adjustment if the fuel line is not connected to the burner at this time. For now, screw in a piece of 5/16 inch tube long enough to reach out of the loco, to slip a plastic tube over and feed water from a can. With a small amount of water flowing, open the loco's blower full, then adjust the atomizer valve for a spray. Look through the fire-door and center the spray. Now check to see if the spray is hitting the fire-pan. If so the burner needs to be tilted up slightly until it clears the pan. That completes the initial adjustment.
You can now remove the temporary oil piping, and complete the fuel oil line and connect up your firing valve to the burner. Further adjustment will be done (fine turning) with the fire burning.
Adjustment
Caution: Be sure to have water in the boiler.
To light the fire, you must connect an auxiliary air supply to your blower and atomizer. Then use a piece of wick on a stiff length of small round rod long enough to keep your hand outside the cab. soak the wick in diesel oil first. Now light this torch and put in the firebox at the back end blow the fire-door. Open blower as much as possible without blowing out the torch. Open the firing valve (oil) for a good heavy flow of oil.
Open the atomizer slowly and control the flame. when a solid heavy fire is established, remove the torch and open the blower full open. Close the fire-door and put out the torch. Watch the stack. Give the fire-box a short time to warm. then adjust oil, blower and atomizer for a good fire. it should be an incandescent bright yellow. Only a slight trace of smoke should be seen at the stack. With a good fire established, you can make final adjustment of the burner. Loosen the screw that holds the burner and tilt the burner up slowly. If you reach a point where the fire shows a noticeable increase, it is probably the best position of the burner tilt. Move past that to see if it gets better. If not, return to that as being the best. if that did not show a noticeable improvement, you already ahd the good one. Return to that and be glad. Minimum tilt is best.
If the burner drips oil, it is a sign of not enough atomizer for the amount of oil being fed to the burner.
It will take a little while to learn to master oil firing. A bit of good old thinkin' will speed it up. Never make any adjustment idly.
Look at the fire and do the following: adjust the firing valve and learn the effect. Do the same with blower and atomizer until you know what each of them does. You will gradually learn what each one does and how they interact. Then, if the fire needs adjustment you will know which valve or valves to adjust and whether to open or close them. You will know what you are doing which is rather nice. If the fire blows out, close the firing valve (oil) immediately. Leave atomizer and blower valves as they are set.
To relight a hot fire-box hold the lighted torch just inside the door where the mist of oil will reach it, and gradually open the firing valve to maintain control.
Cleaning
With good quality, well filtered Number 2 diesel oil and good boiler water, this burner should work 3 to 5 years without attention. When needed, city water from the garden hose blown back through the burner should be enough to remove loose particles. The single screw will remove the brass plate for access to the orifices for the more tightly wedged pieces. Use a wooden toothpick for this purpose. If you just want to brighten it up on occasion, it may be boiled in straight vinegar--one minute only!
We have made every effort to give you a good product. We hope you will enjoy it!!
See Also
External Links
- "In Pursuit of a Better Atomizer Nozzle For Small Oil Burning Steam Locomotives", Jim Keith
- Details of the Southern Pacific "Sheedy" Oil Burner
- Southern Pacific Oil-Fired Firebox and Smokebox Detail
- Locomotive Catechism: "Sheedy" oil burner
- Chaski.org thread on oil burners
- "An Easy To Build Oil Burner", Dick Bagley, Live Steam, November 1981
- "Oil Firing a Miniature Locomotive", Dick Bagley, Live Steam, January 1982
- "Bagley Burner", Chaski.org
- "Oil firing with a Bagley burner", Chaski.org
- "Bagley burner too hot", Chaski.org
- "Bagley burner install", Chaski.org
- "Bagley burner reproduction", Chaski.org


