Track and Switches for Live Steam
Track and Switches for Live Steam
The Model Craftsman, May 1944
Courtesy of Steve Bratina and Chaski.org
The host of questions we of the New England Live Steamers continually receive indicates the growth and interest of the live steam hobby. What is the standard gauge for 1/4 inch, 1/2 inch, etc, scale? What is the height of the trestle? Do you use point switches to get on your train line or do you use a turntable? These seem to be some of the more common questions and the answers to them through an article in our good friend, The Model Craftsman, seems timely.
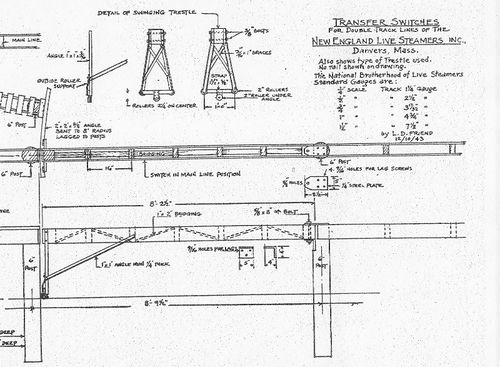
First, because their questions seem most numerous, let's discuss gauges. The gauges which are considered standard by the Brotherhood of Live Steamers and all member clubs are as follows:
- 1/4 inch scale - track gauge 1-1/4 inch
- 1/2 inch scale - track gauge 2-1/2 inch
- 3/4 inch scale - track gauge 3-17/32 inch
- 1 inch scale - track gauge 4-3/4 inch
- 1-1/2 inch scale - track gauge 7-1/2 inch
Minimum radiuses for good operating roads are as follows:
- 1/2 inch scale - 20 foot radius
- 3/4 inch scale - 30 foot radius
- 1 inch scale - 40 foot radius
- 1-1/2 inch scale - 60 foot radius
To make for easier running and less binding of the flanges on curves, and also to allow your engine to ride up and utilize the taper of your tire, it is customary to open up the track gauge on all curves or even slight radiuses. On 1/4 inch or 1/2 inch scale it is not quite as necessary as on the three larger scales. This opening should amount to 1/32 inch for the 3/4 inch scale track on a thirty-foot radius, and this will increase to 1/16 inch on the 1 inch and 1/8 inch on the 1-1/2 inch scale track.
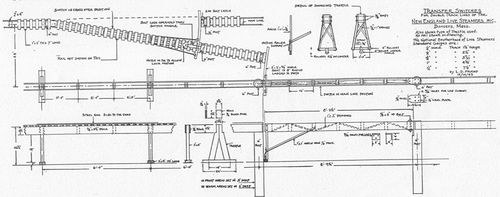
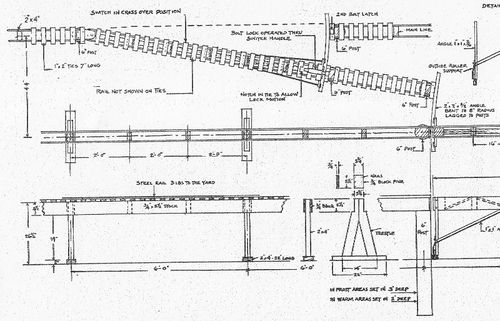
It is most common on 1/2 inch and 3/4 inch scale track to set the track on trestles for ease of operation. The common height which works out splendidly for the tall or short man is 26-1/2 inches from the ground to the top of the trestle, with the tie and the rail adding about 1-1/2 inches for a total of 28 inches. A good trestle construction can be made of ordinary 1 inch by 6 inch fence rail on 2 inch by 4 inch horses, with a 2 inch by 4 inch base on the horse 22 inches long. We have tested a six-foot section with a load of six men and an engine and found only a 1/4 inch deflection. This test certainly indicates a large safety factor for it is not possible, while in operation, to load a section nearly as heavy; this for the reason that an engine and a trolley are approximately five feet long, which allows only one man and an engine to a six foot section. The bases of all horses should be soaked or treated in some manner with creosote, to lengthen their life. The ties are 1 inch by 2 inch by 7 inch long and should be made from a wood which doesn't check or split easily, preferably pine. We have found that square railroad spikes used in these ties to hold the rail down, rust very soon and hold fast through all kinds of weather.
The question has been asked why the track is not built on posts entirely. The answer is that wherever there is frost, this practice does not work out satisfactorily. We have used posts only in the roundhouse and at the end of switches; every Spring these posts all have to be driven back into the ground to their original height. On the other hand, the trestles on a 700 foot loop shift with the weather (coming and going with frost) and in the Spring require only the same type of servicing as the prototype road; we tamp cinders under the trestle bases until the road is back to a true level or the original curve.
The use of trestles allows for a trolley which can be ridden astride, a custom coming more and more into use, both as a comfort and safety measure. For this reason most trolleys should have some form of stirrup or running board, hanging twelve to fourteen inches from the top of the trolleys, and measuring 14 inches from heel to heel of stirrup. This particular width is necessary when passing the swing joint or transfer switches, as a little extra width is necessary at this one point.
The transfer switches shown in the accompanying drawing have been tried and proven by the New England Live Steamers. This particular switch was designed by Charles S. Purinton when he was seventeen years old. Apparently Charles inherits his father's abilities, for he is the son of Carl Purinton, Secretary of the Brotherhood. These transfer switches are excellent from many viewpoints, as the rider doesn't have to dismount from his trolley when coming off the main line onto the round-house, or swapping from one main line to another. Where there are many engines operating at one time, it has been found very convenient to have a switchman tending the switch at all times, handling traffic as they would in any terminal. There is no interruption in operation occasioned by this method. In fastening the rail to the transfer switch it is important to have a slide joint in your rail, somewhere about the middle of the switch itself. Ten-foot sections of rail should be laid onto the switch from the main line, and these rails should be tied together with tie-bars, allowing a little slack. This will permit the track to swing and remain in gauge. Our first experience, which worked very well, was to make little cast-iron "chairs" for the rail to set in. These "chairs" kept the rail gauge correct at all times in any swinging position.
With many new hobbyists entering the live-steam field it is of particular interest to see that standards such as have been established be carefully maintained.


