Charles Field Track Panel Jig: Difference between revisions
(Created page with "Category:Construction Category:Right of Way") |
(→Use) |
||
| (16 intermediate revisions by the same user not shown) | |||
| Line 1: | Line 1: | ||
[[Category:Construction]] | [[Category:Construction]] | ||
[[Category:Right of Way]] | [[Category:Right of Way]] | ||
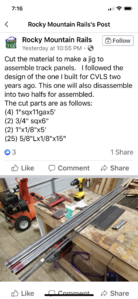
In March, 2020, Charles Field posted on <i>Facebook</i> about a Track Panel Jig that he built. This was the second one of these jigs he constructed. It is light weight and disassembles into two parts for easy storage. It will work for constructing both straight and curved track panels of 10 foot length. | |||
This article presents Charles' original drawings and photos, along with a version modified for [[Texas Standard Tie Spacing]]. | |||
=== The Original === | |||
These photos were provided by Charles Field and come from his original <i>Facebook</i> posting. Used with permission. | |||
This design specifies 4 inch spacing from tie to tie. | |||
<gallery widths=300px heights=300px perrow=2> | |||
File:CharlesField TrackPanelJig 2020-03-30 07.16.18.png | |||
File:CharlesField TrackPanelJig 2020-03-30 07.16.21.jpg | |||
File:CharlesField TrackJig 2020-03-30 07.16.24.jpg | |||
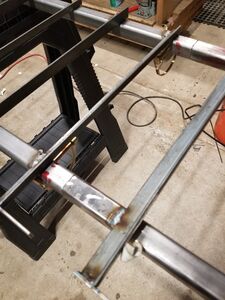
File:CharlesField TrackJig SupportJoint.jpg|Support Joint members in place prior to fill welding. | |||
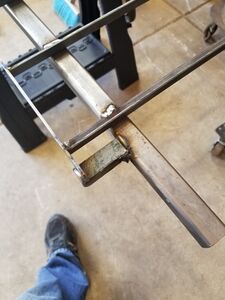
File:CharlesField TrackJig FillWelds.jpg|The Support Joints have been fill-welded to the support beams. | |||
File:CharlesField TrackJig RetentionPin.jpg|Retention Pin holds the two sections of the the track jig together. | |||
File:Rocky Mountain Rails track jig joint.jpg|Tie stops welded to support beams. | |||
File:Rocky Mount Rails track jig added support to tie stop.jpg|Charles added a small support brace for the tie retention bar. | |||
File:Rocky Mountain Rails finish track panel jig.jpg|Completed track panel jig. | |||
File:Rocky Mountain Rails club Track Panel Jig with results July 2020.jpg|Track jig with several completed track panels. | |||
File:Rocky Mountain Rails Track Panel Jig disassembled ready for storage.jpg|A key feature of the track jig is that it can be easily disassembled and stored. | |||
</gallery> | |||
== Texas Tie Spacing == | |||
This design is modified to use the [[Texas Standard Tie Spacing]] of 5.5 inches from tie to tie. | |||
* [http://ibls.org/files/2020/CharlesField_TrackPanelJig/200_Track_Panel_Jig_BOM.pdf Track Panel Jig Bill of Materials (PDF)] | |||
* [http://ibls.org/files/2020/CharlesField_TrackPanelJig/200_Track_Panel_Jig_Assembly.pdf 200 Assembly Drawing (PDF)] | |||
* [http://ibls.org/files/2020/CharlesField_TrackPanelJig/100_Main_Support_Beam.pdf 100 Main Support Beam (PDF)] | |||
* [http://ibls.org/files/2020/CharlesField_TrackPanelJig/110_Main_Support_Joint.pdf 110 Main Support Joint (PDF)] | |||
* [http://ibls.org/files/2020/CharlesField_TrackPanelJig/120_Tie_Stop.pdf 120 Tie Stop (PDF)] | |||
* [http://ibls.org/files/2020/CharlesField_TrackPanelJig/130_Tie_Retainer.pdf 130 Tie Retainer (PDF)] | |||
* [http://ibls.org/files/2020/CharlesField_TrackPanelJig/150_Sagitta_Rule_for_10_Foot_Rail.pdf 130 Sagitta Rule for 10 Foot Rail (PDF)] | |||
== Use == | |||
[[Daris A Nevil]] wrote: | |||
: The [[Charles Field Track Panel Jig]] can be used to construct straight as well as curved track panels (see [[Sagitta Rule]]). I use ties produced by [[Enterprise Plastics Inc]], as it makes panel assembly super easy. | |||
: Here is how I build curved panels with 50 foot radius. | |||
<gallery widths=300px heights=300px perrow=2> | |||
File:2020-11-28 11.23.54.jpg|Step 1: Ties are placed in the jig with [[Sagitta Rule|pre-curved aluminum rail]] on top. | |||
File:2020-11-28 11.35.03.jpg|Step 2: Track screws are started but not tightened in this step. | |||
File:2020-11-28 11.35.17.jpg|Step 3: The gap in the rail is staggered to prevent sagging over time. Two screws are used to attached the end of the rail in the middle of the tie plate on the third tie from the end. Do this on both ends. A welding clamp is used to hold these two ties in place. | |||
File:2020-11-28 11.41.16.jpg|Step 4: Start at one of the clamped ties and tighten all screws on that tie. The plastic tie plates will help align the tie tangent to the curved rail. Make sure one end of the tie touches the tie stop on the jig. | |||
</gallery> | |||
: The procedure for building straight panels is even simpler. | |||
<gallery widths=300px heights=300px perrow=2> | |||
File:2020-11-28 12.10.50.jpg|Step 1: Place ties on the jig with straight rails on top. Start track screws to hold things in place. | |||
File:2020-11-28 12.16.06.jpg|Step 2: Clamp the third tie from each end in place. Use two screws to fasten a rail in the middle of the tie plate. Start at one of the clamped ties. Tighten the screws on each tie, making sure the tie is touching the tie stop on the jig. | |||
</gallery> | |||
Latest revision as of 23:14, 1 December 2020
In March, 2020, Charles Field posted on Facebook about a Track Panel Jig that he built. This was the second one of these jigs he constructed. It is light weight and disassembles into two parts for easy storage. It will work for constructing both straight and curved track panels of 10 foot length.
This article presents Charles' original drawings and photos, along with a version modified for Texas Standard Tie Spacing.
The Original
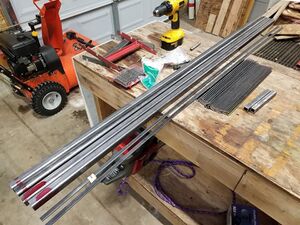
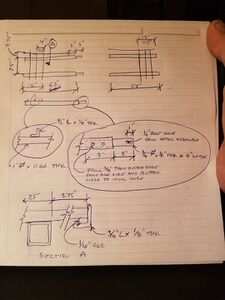
These photos were provided by Charles Field and come from his original Facebook posting. Used with permission.
This design specifies 4 inch spacing from tie to tie.
Support Joint members in place prior to fill welding.

The Support Joints have been fill-welded to the support beams.
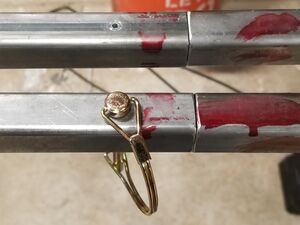
Retention Pin holds the two sections of the the track jig together.
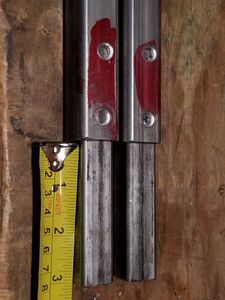
Tie stops welded to support beams.
Charles added a small support brace for the tie retention bar.
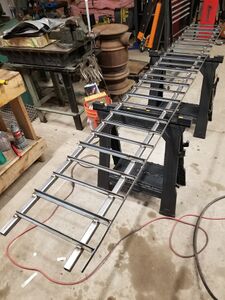
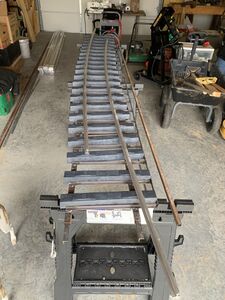
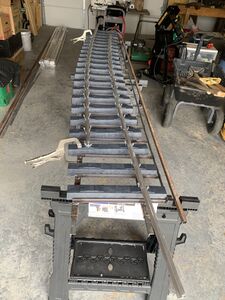
Completed track panel jig.
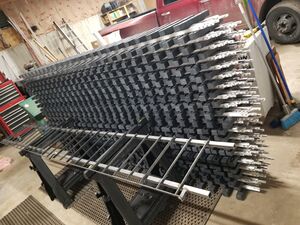
Track jig with several completed track panels.
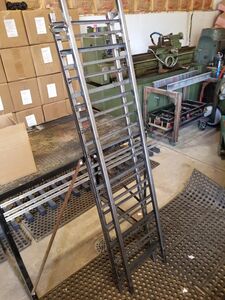
A key feature of the track jig is that it can be easily disassembled and stored.


Texas Tie Spacing
This design is modified to use the Texas Standard Tie Spacing of 5.5 inches from tie to tie.
- Track Panel Jig Bill of Materials (PDF)
- 200 Assembly Drawing (PDF)
- 100 Main Support Beam (PDF)
- 110 Main Support Joint (PDF)
- 120 Tie Stop (PDF)
- 130 Tie Retainer (PDF)
- 130 Sagitta Rule for 10 Foot Rail (PDF)
Use
Daris A Nevil wrote:
- The Charles Field Track Panel Jig can be used to construct straight as well as curved track panels (see Sagitta Rule). I use ties produced by Enterprise Plastics Inc, as it makes panel assembly super easy.
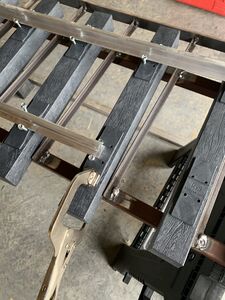
- Here is how I build curved panels with 50 foot radius.
Step 1: Ties are placed in the jig with pre-curved aluminum rail on top.
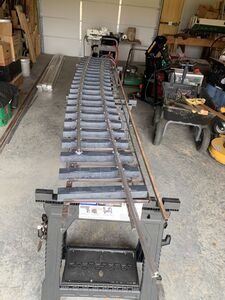
Step 2: Track screws are started but not tightened in this step.
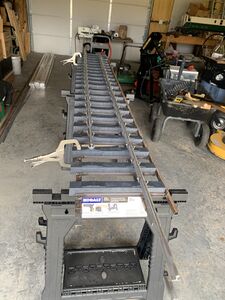
Step 3: The gap in the rail is staggered to prevent sagging over time. Two screws are used to attached the end of the rail in the middle of the tie plate on the third tie from the end. Do this on both ends. A welding clamp is used to hold these two ties in place.
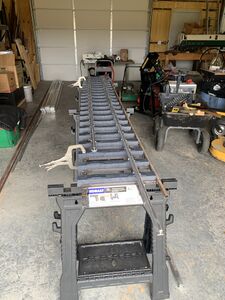
Step 4: Start at one of the clamped ties and tighten all screws on that tie. The plastic tie plates will help align the tie tangent to the curved rail. Make sure one end of the tie touches the tie stop on the jig.


- The procedure for building straight panels is even simpler.
Step 1: Place ties on the jig with straight rails on top. Start track screws to hold things in place.
Step 2: Clamp the third tie from each end in place. Use two screws to fasten a rail in the middle of the tie plate. Start at one of the clamped ties. Tighten the screws on each tie, making sure the tie is touching the tie stop on the jig.

