Building Tank Cars
From "Stack Talk", September and November 2014, Houston Area Live Steamers.
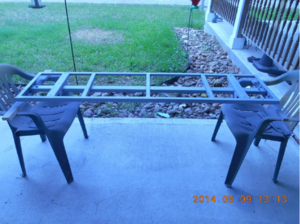
All the tank cars need a frame to start with. Mine normally use a 1 by 2 inch rectangular steel tubing with shorter pieces creating a "tee" on both ends. The rectangular tubing is 1/4 inch longer on both ends so that the frame sticks out beyond the car ends. Spacing the shorter pieces of rectangular tubing between 7 and 8-1/2 inches from the end and welding all together. A hole is drilled at the center of both tees to place a 3/8 inch bolt then weld the head to the frame. The bolt sticks thru to hold the trucks in place and then a lock nut or cotter pin to keep the truck from falling off if the car is picked up to rerail. With Tom Bee trucks I add a 3/8th inch thick 2 inches wide and 7 inches long centered on the tees to keep the coupler height at the proper height from the rail.
Also, 3/8th inch holes are drilled in both ends depending on which coupler is used, between 1-3/4 to 2-1/2 inches from the end. I usually weld a lock nut on top of the frame and run the bolt from the bottom through the coupler to hold it in place.
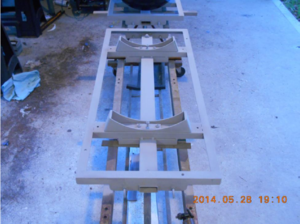
Next comes the upper part of the frame consisting of 1 inch angle iron. These are welded together forming a rectangular frame work that will eventually sit on top of the spine or backbone of the car. The upper frame work or sub-assembly is placed on top of the lower frame work and all is welded together. My frames are generally 15 inches wide by how ever long they need to be for the tank car.
At this time, the stirrups can be either welded on all four corners and in the centers or bolted on. Also, dummy air tanks can be placed where desired. Mine are created from smaller PVC end caps and all glued together. They are mounted to the underside of the frame using flat aluminum bolted and small bolts into the "tanks" threaded into the bodies. The PVC will take bolt threads, usually 6-32 threads. Also the bracket has holes that are bolted to the frame again taping into the frame with a 6-32 tap.
At this time, locate where the tank saddles will go and mount to frame at the two body bolsters. Drill holes now where the tank straps will be as this will be easier now than later. Other holes to the frame can also be drilled now such as placard holders and brake wheel assemblies.
If safety chains will be a part of the car, then the locations for the eye bolts are drilled.
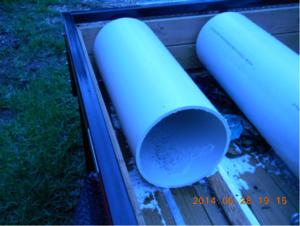
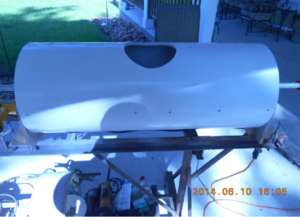
The tank car body consists of usually schedule 40 PVC pipe that has been cut to length. To get a square end, I take some aluminum flashing at least 6 inches wide and wrap around the pipe and both ends match up. This is taped together and sliding it where I want to cut, I mark all the way around the pipe either with a fine point marker or a pencil. After insuring the mark goes all the way around, I then slide the aluminum flashing out of the way of the cut line.
You can use a hand saw, PVC saw, or a circular saw using a fine or plywood blade. Be careful when cutting and take your time. Also, try to cut just outside of the line, this can be sanded later. Be sure to support the large pipe as you cut it to keep the saw from binding and possible kicking back. Cutting the pipe with a circular saw creates a lot of sawdust the will clog between the saw blade and the protective cover. Stop once in a while to clean this out.
The pipe body has now been cut to the desired length, slide the flashing back to the end and check to see if the ends are square and how much material needs to sanded off. Take a large square and check all the way around the pipe in several places. Sand or file until you are satisfied your ends are square.
To find the top and bottom lines, start off by locating the bottom line from end to end using a long piece of angle iron marking the line. Next, the top line will be marked exactly half way around checking in both directions to get equal measurement (on 12 inch schedule 40, half of just over 40 inches) and after locating, again take the angle iron and draw the line from end to end. Other lines such as the handrails, walkway, etc. will be marked where desired from the bottom line making sure all lines are the same placement.
Next, determine where the dome(s) will be. If only one then the center of the body. Also, at the center, draw a line all the way around using the straight edge of the flashing that was used in cutting the pipe's length. Locate where the tank saddles will be matching up with the body bolsters on the frame and draw another line all the way around again using the flashing straight edge. The bottom center of the lines will be where the bolts holding the tank to the frame through the saddles will be.
Other lines such as the hand rail brackets, walkway, ladders, and grab irons are marked. Once happy with the locations, holes can be drilled and tapped for the various bolts and screws that will go into the pipe body.
The openings for the domes are marked and cut with a jig saw then sanded with a drum sander in a drill until the dome's pipe fits into the tank body. Carefully sand keeping the drill vertical or straight up and down.
I use a jig or pattern for marking the hole and at the same time if rivets will be part of the build, I mark them using a small center punch. Tape holds the pattern in place while marking the outline of the home and also the rivets.
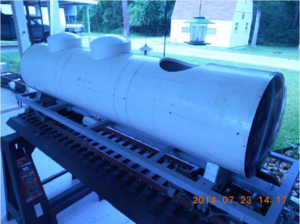
My domes use six inch PVC schedule 40 end caps held in place with a short piece of 6 inch pipe. The domes are saddle cut again using a pattern or jig I made sometime ago out of some aluminum flashing. Once satisfied where the saddle cuts will be, I use a jig saw to cut the cap to a rough form. After that, I use a table mounted belt sander to refine the cut more to shape checking often for fit in top of the tank body. Next, I clamp several wide strips of old belt sander belts around a scrap piece of twelve inch pipe same as the body and "lap" the cap back and forth until it fits on top of the tank body.
Somewhere while marking the tank body for the various holes if rivets are to be part of the built, lines are drawn locating each rivet. The lines I draw are usually 3/16th inch apart and each rivet is spaced 3/8th inch apart staggering between the two closely spaced lines. The above photo gives and idea of how I place them on a typical car or in this case, a three domed tank car.
After all the rivets are located, I center punch then drill for the rivets, in this case, no. 2 button head drive screws 3/8th inch long. A longer car can take more than 2000 rivets including those on the domes.
After getting the tank body the way it needs to be and the large parts fit, it is time to do the hand rails and ladders and platforms, etc.
For the hand rail stanchions, I've already drilled and tapped 1/4" X 20 threads into the tank body in the desired locations along both sides. I take 1/4 inch brass rod and cut threads on one end about 5/8 inch long and then drill a 1/8 inch hole on the other end where the hand rail will pass through. After that, the brass rod is cut to length and the exposed end is rounded off a bit by sanding on my belt sander. Repeat the process for the number of stanchions needed, the longer the tank car, the more you will need.
The four stanchions closest to the center of the ladder will instead have the hole drilled and tapped to accept a no. 6 X 32 thread. The end of the hand rail will screw into these to hold it in place having those ends threaded to fit.
Depending on if the hand rail will extend around to the tank car ends, I will bend more of the 1/8 inch rod to follow the curve of the end. More stanchions will be made for this except they are longer on the threaded part so as to pass all the way through and a lock nut on back side will hold them in place.
Where the curved and straight handrails come together, I use a short piece of 1/8 inch i.d. tubing to hold both parts together.
On to the ladder, usually I use a piece of 1/4 inch brass rod for the ladder rail and 1/8 inch brass rod for the rungs. The top end of the rail will be threaded for 1/4" X 20 so as to go into holes in the tank body and lock nuts to hold ladder in place. The rail will be bent to get the desired shape taking care as you heat it and bend it not to get too aggressive or it will break. Then you have to start all over again on that part. Getting the rails bent and all four pieces the same, next comes drilling 1/8 inch holes where the rungs will pass through eventually getting soldered in place. The rungs can be cut however long that you want the ladder width to be. Be sure to clean the ends and get them all the same.
Take all the ladder parts and feed the rungs into the holes along the rail sides making sure the ladder is square and everything lines up. Solder all the rungs in place and once happy with your results, clean off all excess solder and file where the rungs are to get a nice appearance.
The top end of the ladder will go into holes drilled into the pvc tank body held in place by a 1/4 inch locknut and the bottom will go through holes drilled into the frame. This end will not be fastened down.
The walkways are usually 1/8 inch by 1-1/4 inch by however long desired flatbar steel. I weld either 3/16 inch or 1/4 inch carriage bolts to the bottom making sure the threads are long enough to pass through the tank body so as to bolt it in place. On the other end of each bolt, I cut off the excess and grind or sand it. Anywhere from 3 to 5 bolts are normally enough to hold your walkway in place. Where bolt passes through the tank body, the threaded end is bent so walkway is not sloped so your pretend worker doesn't slip and fall.
Taking the tank car ends, I temporally taped them to the tank body and locate a number of screw holes to hold the ends in place. I use #4 by 3/4 inch brass wood screws located about every 5 inch or so around the circumference of the pipe. To get the screws started in the flange on the ends, I drill a very small hole where the screws will go. The plastic ends will self-tap as you drive the screws in, just don't get too rough or you will strip the holes out. Be sure parts of the frame will not interfere with using a screwdriver on the lower screws.
The brake wheel housing is mounted on a piece of aluminum flat bar wide enough for the housing. Use small bolts (#4) doing this to include where you mount it to the frame.
If placards are to be part of your build, I use pieces of 1-1/2 inch aluminum flat bar cut to 1-1/2 inch long to form a square. This rotated 45 degrees will form a diamond shape. It is mounted to a 1/4 inch bolt to a hole drilled in the frame with a lock nut holding it down. The top has two holes drilled though the diamond top and bottom and tapped for #4 X 40 screws. Corresponding holes are drilled through the bolt and screws are passed through the holes into the placard. Remove any excess screw sticking out so you have a flat surface to place your placard sticker on.
The fake air tanks mounted to the frame are various sizes of small pvc fittings glued together to get your desired size and shape. They are held to the frame with aluminum flat bar wide enough to get your mounting brackets for your tanks. The PVC pieces are thick enough to where you can drill and tap holes for #6 screws. I found it is a bit easier to mount the brackets to the frame before putting the tank body on.
The safety chains are a welded #2 continuous link chain cut to about 5-6 inches long. I use a quick link on both ends that will make the chain to the proper length. The eye bolts are 1/4 inches and long enough to have a nut on both sides to hold them in place. There are two on each end on the car spaced 5 inches apart of 2-1/2 inch from the center line of the coupler. Facing each end, the eye bolt loop on the left is opened wide enough so that the quick link drop in. The other side will not be taken on and off. When not used, it is a good idea to take the loose end and drop back in the other eye so as to not have the chain dragging as the car goes down the track.
After all the detail stuff has been fitted, now comes the fun part. Yes, I do mean painting. Everything has to come back off so each piece can be properly painted. Be sure to note where each piece and part came from, this helps in reassembly later.
I have a couple of round pieces that fit tight into the tank body and various pipes depending on the tank lengths. This is mounted on a pair of v-shaped blocks of plywood at each end. This allows me to slowly rotate the pipe as painted to minimize paint runs. I use the spray paint that comes in the spray cans and have had fairly good luck with that. However you may paint, make sure your work is clean and dry and if outdoors, no wind as this will carry dust onto fresh paint and mess you up.
Follow whatever paint directions you use and don't rush it. Allow the correct intervals between coats and don't get it on too thick... Top coat with whatever color your tank car will be again in several coats per the paint's directions.
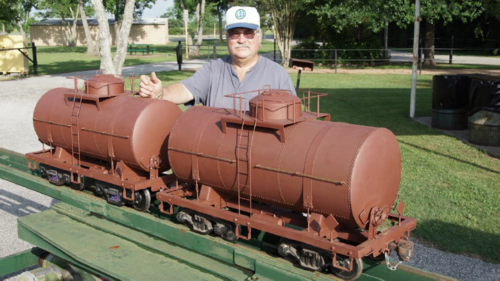
After you are satisfied with your painting efforts, put the car back together for the last time (you hope). Don't scratch the paint doing so. Decal the car and it should be ready to place in service. Enjoy your new tank car and hopefully you will get many years of service from it.
Epilogue
Gary wrote 28 September 2016:
- I bought the ends from Mountain Car Company for about $150 for the pair. They are made to fit schedule-40, 12 inch diameter PVC pipe. The platforms with the hand rail and ladders also came from them. Other detail stuff came from various vendors. I made the hand rail stanchions and hand rails along both sides of the car body myself from brass rods both 1/4 inch and 1/8 inch. Of course Mountain Car is now called Titan Trains. Jim Humphrey still works there.
