486 Gets A New Oil Tank: Difference between revisions
No edit summary |
No edit summary |
||
| Line 1: | Line 1: | ||
[[Category:Construction]] | [[Category:Construction]] | ||
[[Category:Steam Locomotive Parts]] | [[Category:Steam Locomotive Parts]] | ||
by [[Daris A Nevil]] | |||
No 486 was converted from wood to oil early in its life. The original oil tank was very simple, consisting of a 1 gallon tin gas can with a 1/8 NPT fitting soldered to the bottom front of the can. Not a very pretty setup, but it worked. That is until the soldered fitting came loose. | |||
A search began for a better solution. Some prototype locomotives that were converted from coal to oil used tee-style oil tanks. I found an image of an Allen 10-Wheeler on <i>Chaski.org</i> with just such a tank (see photo below). This is the direction I decided to go. | |||
I designed the tank from scratch by taking measurements of the tender where the oil tank would reside. I used the free CAD software offered by [http://www.emachineshop.com/ <i>eMachineShop</i>] to draw the sides of the container. To make sure the sides all fit together as planned a small model was printed on card stock, cut out and taped together. The resulting model, shown below, proved the design was sound. | |||
<i>eMachineShop</i> also offers fabrication services. Five sets of tanks were laser cut from 16 gauge 1018 [[CRS]]. | |||
The fill neck was turned from 1-1/4 inch black iron pipe. The fuel cap was turned from a pipe cap. A small 3/32 hole was drilled in the top to allow air into the tank as the fuel drains out. A small flash guard was fabricated from sheet brass and inserted into the interior of the cap. | |||
A fuel drain fitting was turned from 3/4 inch [[CRS]], threaded for 1/8 inch NPT. | |||
My friend, Stephen Grief, professionally welded the tank together. The interior was sealed with <i>Red Kote Fuel Tank Liner</i>. This prevents rust from forming on the interior, and assures any pinholes in the welded seams are sealed. | |||
<gallery widths="300px" heights="300px"> | <gallery widths="300px" heights="300px"> | ||
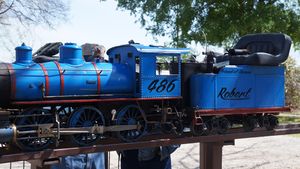
File:No486 with 1gallon oil can tank 2013.jpg|Allen Mogul "Robert" No 486 at the [[Annetta Valley & Western Railroad]], April 2013. Note the old 1 gallon "gas can" oil tank mounted in the tender. Photo by [[Daris A Nevil]]. | File:No486 with 1gallon oil can tank 2013.jpg|Allen Mogul "Robert" No 486 at the [[Annetta Valley & Western Railroad]], April 2013. Note the old 1 gallon "gas can" oil tank mounted in the tender. Photo by [[Daris A Nevil]]. | ||
File:Allen 10 Wheeler with Oil Tank.jpg|An Allen 10-Wheeler with a T-style oil tank. | |||
File:Mogul Oil Tank Layout.png|A great deal of time was spent arranging the parts to minimize the cost of laser/water-jet cutting from steel. | File:Mogul Oil Tank Layout.png|A great deal of time was spent arranging the parts to minimize the cost of laser/water-jet cutting from steel. | ||
File:Allen Mogul Oil Tank Cut Parts.jpg|A spread of laser cut steel parts. | File:Allen Mogul Oil Tank Cut Parts.jpg|A spread of laser cut steel parts. | ||
| Line 10: | Line 28: | ||
File:Allen Mogul Oil Tank Test Fit2.jpg|A different view of the test fit. | File:Allen Mogul Oil Tank Test Fit2.jpg|A different view of the test fit. | ||
File:Completed Mogul Oil Tank.jpg|A fresh coat of paint completes the construction of the oil tank. | File:Completed Mogul Oil Tank.jpg|A fresh coat of paint completes the construction of the oil tank. | ||
File:RedKoteFuelTankLiner.jpg|Red Kote fuel tank liner. | |||
</gallery> | </gallery> | ||
Revision as of 00:13, 9 June 2015
No 486 was converted from wood to oil early in its life. The original oil tank was very simple, consisting of a 1 gallon tin gas can with a 1/8 NPT fitting soldered to the bottom front of the can. Not a very pretty setup, but it worked. That is until the soldered fitting came loose.
A search began for a better solution. Some prototype locomotives that were converted from coal to oil used tee-style oil tanks. I found an image of an Allen 10-Wheeler on Chaski.org with just such a tank (see photo below). This is the direction I decided to go.
I designed the tank from scratch by taking measurements of the tender where the oil tank would reside. I used the free CAD software offered by eMachineShop to draw the sides of the container. To make sure the sides all fit together as planned a small model was printed on card stock, cut out and taped together. The resulting model, shown below, proved the design was sound.
eMachineShop also offers fabrication services. Five sets of tanks were laser cut from 16 gauge 1018 CRS.
The fill neck was turned from 1-1/4 inch black iron pipe. The fuel cap was turned from a pipe cap. A small 3/32 hole was drilled in the top to allow air into the tank as the fuel drains out. A small flash guard was fabricated from sheet brass and inserted into the interior of the cap.
A fuel drain fitting was turned from 3/4 inch CRS, threaded for 1/8 inch NPT.
My friend, Stephen Grief, professionally welded the tank together. The interior was sealed with Red Kote Fuel Tank Liner. This prevents rust from forming on the interior, and assures any pinholes in the welded seams are sealed.
Allen Mogul "Robert" No 486 at the Annetta Valley & Western Railroad, April 2013. Note the old 1 gallon "gas can" oil tank mounted in the tender. Photo by Daris A Nevil.
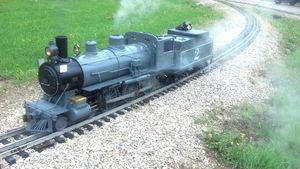
An Allen 10-Wheeler with a T-style oil tank.
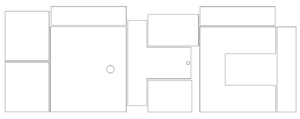
A great deal of time was spent arranging the parts to minimize the cost of laser/water-jet cutting from steel.
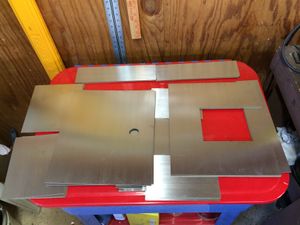
A spread of laser cut steel parts.
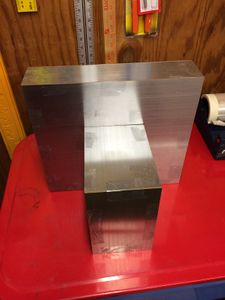
The cut components were test fit together. The corners were taped together using packing tape. This was used as a model for other tanks as they were welded together.
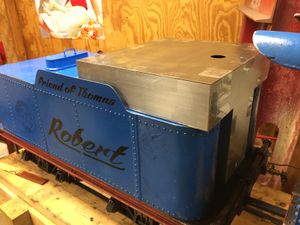
The temporarily constructed oil tank is tested for fit in the Allen Mogul tender.

A different view of the test fit.
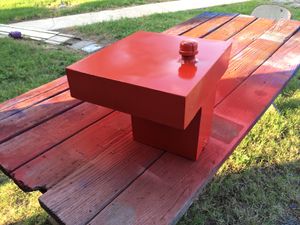
A fresh coat of paint completes the construction of the oil tank.
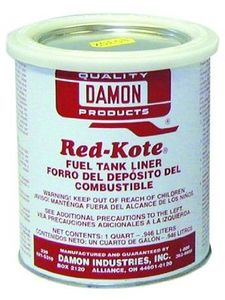
Red Kote fuel tank liner.


