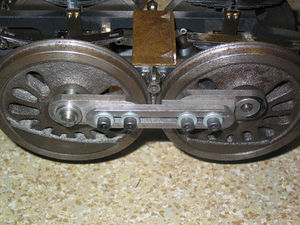
Witness Bar for Side Rods
Will posted the following on Chaski.org:
I recently read a posting about frames. He was concerned with the dimensions that he had gotten after machining them. The main problem was to do with the journals, and how well he had machined them to size.
I read about this fix in The Miniature Locomotive May 1952 issue.
I have done it this way many times myself. Here is a way to do them with a small mill without a DRO.
Everybody agrees that both frames must be done together however you want to hold them together is up to you.
Paint them with layout dye and mark everything to be machined.
You can drill holes and hacksaw them out, then mill the journals with your small milling machine. No DRO used here. See the drawing below.
After you finish machining check all the journals for the dimensions that you wanted. If they are not all the same size for whatever reason, they must be all opened up to the largest journal size that you found. On the journals that you will re-machine I only take off on one side to make it the size that I needed. If you try to machine both sides it will only give a chance to make more mistakes.
If you're thinking now my center-to-center on my journals are not to print, you should not have been so far off as it cannot be saved.
We are now going to fix it so your side rods will work. Take a piece of bar stock large enough to turn a plug that will fit tight in the journal box and long enough so you can cut off two pieces after turning as long as the thickness of each frame. Before you take the piece out of the lathe, center drill it. Then drill a 1/8 inch hole deep enough so when you part off two pieces the length of the frame thickness the hole will go through them. If you are working on a large scale locomotive, you could use a larger drill.
You will use the plugs to make a witness bar for the center-to-center dimension of the side rods. If you are making a locomotive with more drivers, you will make a bar for each length of side rod needed.
As shown in my drawing, place a plug in each journal to make the witness bar. This will give you an acquire dimension to be able to transfer the holes of each side rod needed. Drill through the first plug in the bar; insert a 1/8 inch pin to hold that position. Drill through the next plug for your exact measurement of the side rod.
Because you may have remachined some of the journals, your center-to-center of the drivers will be off a few thousands. But the side rods will now be the right length for them.
If all your machining was right the first time, and nothging was off, you only need to make the plugs and witness bars to transfer to your side rods. No need to measure that length.
Good Luck.
Crank Pin Witness Bar
Don Carr posted the following on Chaski.org:
- The first job I wanted to do was to determine the side rod crank pin spacing using the fixture as I was curious to find out how uniform and close (or not) was the spacing to the print dimensions.
- This goes right the way back to the layout and machining of the main frame axlebox openings, the machining of the axleboxes themselves, how central the axle opening is in the axleboxes and how accurate and uniform are the crankpins and crankpin throws on the main drivers.
- All of the above factor into where the crankpin openings in the side rods will come out. Also, any of the above must be constructed to a tolerance which may be random, additive or cancelling.
- Remember, I use nothing digital, the axlebox openings in the main frames were laid out using a good graduated scale, eye loupe and scriber.
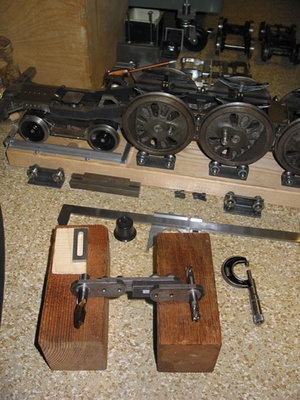
- The side rod fixture merits some discussion first on how it is used.
- The socket head cap screws are first loosened and the length of the fixture is adjusted until the fixture slips over the two driver crank pins without shake or binding. The correct press fit on the hardened drill bushings allow this to be done very easily if the crank pins themselves are machined dead on size. Now tighten the cap screws. Now check that both drivers will rotate 360 degrees without binding with the fixture in place.
- 99% of the time, on the first go round, the two drivers will bind usually at or near the front and back dead centers. Where binding is first encountered carefully loosen two of the cap screws at one end of the fixture (without touching anything else) and then carefully re tighten them without physically altering the length of the fixture. Now you will be able to rotate the coupled wheels just a bit more before the drive wheels again bind. Now, just repeat the process again carefully until the coupled drivers are just able to be rotated past their dead center(s). You have now found the sweet spot which is where the two coupled crank pins are exactly aligned radially. Carefully, fully tighten all cap screws and check to see that the wheels will rotate freely 360 degrees. If the fixture now binds in other locations, the crank pin throws are out.
- Correctly made, the fixture is very sensitive in this regard and it will always show if your crank pin throws are out.
- Some things to note.
- Depending upon the length and configuration of the crank pins on any particular locomotive, different lengths and thickness of the spacer piece (or none at all) will be needed to have the fixture fully seat on the two crank pins. In the photo, one spacer piece is shown sitting on one of the wooden blocks while a thicker one (the dark metal) is on the fixture itself.
- The slot length(s) in the various pieces need to be made so that the fixing cap screws are always free of the ends of a slot as a fixing screw restrained at the end of a slot behaves just like a drive wheel bind. Also, no part of the fixture should touch a crank pin when the wheels are rotated. Obvious, but easily overlooked.
- As shown in the photo, when I measured over the pins (with the vernier caliper shown in the photo) inserted in the drill bushings, I got a vernier reading of 5.749 inches. The Josslin print shows a distance of 5-5/16 inches centerline to centerline distance between the crankpin openings on the rear side rods. The two openings are 1/2 inch and 3/8 inch finish bushed.
- You be the judge. I guess (any of) the errors made were in this case cancelling. Beginners luck?


