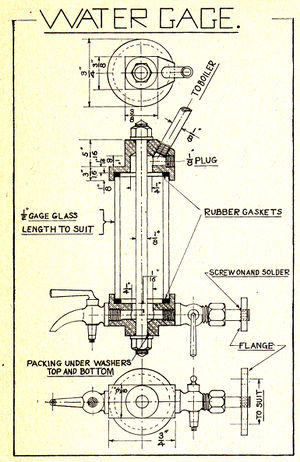
The Martin Lewis Water Gauge
Water Gage
Mechanical Models, January 1938
Small water gages with 3/16 inch and 1/4 inch O.D. glass tubes as ordinarily used to maintain close to scale sizes are not so very reliable because capillary attraction causes the water to show higher than the actual level above the crow sheet.
Some boilers steam better at lower water levels than others and an accurate water gage is necessary to control properly the feed water to be injected or pumped into the boiler. Gage cocks are also a necessity on all boilers to check up on the water gage, but they are not used as frequently as the water gage itself and as they usually make a mess of the cab and boiler head, they should discharge into a trough piped to the outside.
With the following requirements in mind the gage as shown as developed and has proven very satisfactory in service on locomotive, stationary, and marine boilers.
Water Gage Requirements
- Easy sight reading of correct boiler water level.
- Means of shutting gage off from boiler for gage glass replacement in case of breakage.
- Fastening to boiler in such a manner to avoid gage glass breakage due to expansion or distortion of boiler head under pressure.
Construction
The 1 inch bronze rod is chucked in the lathe and bored out to dimensions after drilling the 1/4 inch hole to proper depth and the 1/8 inch holes through, then measured and cut off. Repeat the operation and you will have two gage bodies in the course of manufacture. Note that while the top and bottom are the same as to the gage glass recess, the outside details are different.
Take one piece for the upper body, saw to form, unless you have a milling machine or milling attachment for the lathe. In case you use a hacksaw make allowance for finishing with a file and by buffing. After sawing or milling, drill and tap as per drawing. Now take the lower body and get it into shape. Note that there is to be packing under the top and bottom washers and that both bodies should be counter sunk for this. The flange to the boiler is to be cut from the 1 inch bronze bar, drilled, tapped, filed to shape an screwed and sweated on the nipple as shown. A paper gasket is used between flange and boiler. The gage glass should be of 1/2 inch O.D. Red Line, that is, there is a red enameled line running lengthwise of the glass to make easy reading because of the refraction which makes the red line seem offset below the water level. Both ends of the gage glass should be even and at right angles to the sides of the glass tube so that it will draw squarely against the rubber washers or gaskets in the upper and lower gage bodies when the nuts and the studs are tightened. The recesses for the gage glass should be made a little larger than the glass itself to allow for expansion. The gage glass can be centered by wrapping a few turns to thread or string around the glass before setting it in place in the bodies. After tightening the glass in place you can unwind the thread and the glass will be central with the bodies and if the ends of the tube are square with the sides, and assembly will be true.
Fit to the boiler by means of machine screws so that the lower water inlet to the gage is the desire height above the crown sheet, using a paper gasket and plastic gasket compound. Don't get any of the compound in the water inlet, use it sparingly.
The upper gage body is to be connected to the highest point of the boiler, using 1/8 inch copper tube threaded and screwed into the upper gage body. A 1/8 inch single union cock should be put in the line. The union cock male end should be screwed into the union cock sleeve. With this hook-up you can quickly replace a broken glass. Shutting off the top and bottom cocks, open drain cock, then loosen the union nut at the upper cock, take off the top stud nut, lift off the upper body, remove old glass and washers, replace the new glass and new washers, connect to upper union cock, open lower boiler cock, close drain cock and allow the glass to warm up, then open upper union cock and there you are all fixed up with a new gage glass installed. Of course, you can have any length gage you want.
The lower gage body should have a 3/16 inch single union cock connecting it to the boiler so that the gage can be set vertically or at any angle across the boiler head by simply tightening the union cock nut when you have the gage set where you want it. Of course the shut off cocks can be omitted if so desired but they are certainly most desirable. However, the gage as described is very practical and presents a good appearance.
Bill of Materials
Materials needed for this water gage
