TLS Sander
The Miniature Locomotive, September-October 1954:
Miniature steam locomotives, like their prototypes on full size railroads, are often plagued with rail conditions which reduce the factor of adhesion to such a degree that the drivers will slip. Water, oil, grease and rust...anything other than perfectly shiny rail...can disrupt operation of heavily loaded trains, especially on grades. Even starting and stopping are difficult under such circumstances.
Several things affect the factor of adhesion for a locomotive. But only the installation of rail sanders can be made easily to an engine after it has been built. The factors which are not so simple to improve on are rail material and wheel or tire material.
In the spring of 1953, while Pacific No. 147 was undergoing extensive repairs and alterations, the 7-1/4 inch gauge Tipsico Lakeshore Railroad, near Detroit, designed and built a set of four air-operated sanders, which, while not scale reproductions of full size sanders, work on the same principle and have proved to be extremely reliable in actual service. Their appearance would be satisfactory on any locomotive from 1-1/2 inch to 3 inch scale. Their capacity is sufficient for all such engines, too.
Before describing the construction of the T.L.S. sanders, let's look at a table of adhesion factors to find out just how much good sanders will do.
The effective tractive force of any locomotive, no matter what its driver diameter, cylinder size, cutoff and working steam pressure, is calculated by multiplying the weight on the drivers by the proper factor of adhesion for various wheel and rail conditions. This is the maximum possible pull obtainable before the drivers will slip. If the theoretical tractive force of a locomotive is below this maximum, its wheels will not slip.
Accepted factors of adhesion are as follows:
- 15% for wheels on moist or greasy steel rail
- 20% for chilled iron wheels on clean, dry steel rail
- 25% for rolled steel wheels on clean, dry steel rail
- 25% for chilled iron wheels on well-sanded steel rail
- 30% for rolled steel wheels on well-sanded steel rail
The application of sand, therefore, can boost the effective tractive force of many locomotives...the ones whose wheels slip on dry rail when full throttle is applied...five per cent. All engines can benefit from sanders when running on moist or greasy track.
When the Tipsico set out to build sanders for No. 147, four goals were kept in mind: (1) They should be reliable even in damp weather and under conditions of vibrations; (2) They should be easily controlled and adjusted; (3) They should be easy to clean, if they become clogged for some reason; (4) They should be simple to build and install. All these goals were reached although the actual installation was more time-consuming than had been anticipated.
The heart of any air-operated sander is the sand trap which keeps sand from falling by gravity to the rails, but which allows sand to pass in a fine, steady stream when air is blasted through it. The fact that there are no moving parts makes it easy to construct.
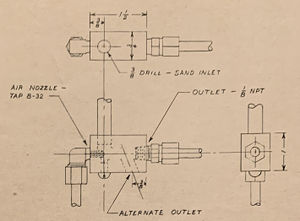
The Tipsico Lakeshore's sander is composed of a steel body with nozzle assembly, intake pipe, clean-out plug and alternate outlet fittings. Sand falls a short distance into the trap by gravity and is blown down to the rail by a blast of air from the nozzle. Air flow is controlled from the locomotive's cab with a 1/8 inch NPT needle valve, and two Schrader No. 7796 button controlled valves, one for the two reverse sanders, turn the air on and off.
Construction of the four sanders was started by cutting pieces of steel 3/4 inch by 1 inch by 1-1/2 inch. Pilot holes were drilled through the length of each piece on center with a No. 29 drill and vertically 3/8 inch from one end, with a No. 16 drill...correct sizes for tapping 8-32 and 12-24 threads respectively. A semi-vertical outlet was desired in two sanders so another pilot hole, 3/8 inch from the opposite end on the bottom of these pieces was drilled at an angle of approximately 75 degrees to the intersection with the horizontal hole.
Next, 3/8 inch holes were drilled in all the sanders vertically from the top of the vertical pilot holes to a depth of 11/16 inch. The horizontal pilot hole in each was drilled out to 5/16 inch diameter from the opposite end clean through to the 3/8 inch vertical hole. The alternate semi-vertical outlets, too, were drilled out to 5/16 inch diameter to their intersection with the horizontal outlet holes.
All the passages in the sand traps were now complete. All that remained to be done was to tap the 5/16 inch holes for 1/8 inch pipe thread, the No. 29 for 8-32 screws and the No. 16 holes for 12-24 screws. The pipe tap was turned as deep as possible in order to reduce the overall dimensions of the completed sanders. Short 12-24 round head brass screws were inserted at the base of each trap as clean-out plugs, and weatherhead ball solderless type tubing connections with 1/8 inch male pipe thread on one end and 1/8 inch tube fitting on the other were screwed into one of the two outlet holes in each trap. The unused outlet holes were closed with 1/8 inch pipe plugs.
Then, pieces of 3/8 inch O.D. copper tubing...long enough to reach into the base of the sand dome from where the sanders were to be located...were cut for inlet pipes. They were flared into holes in the bottom edge of the dome, then soldered into the top holes in each sander as it was being installed later.
Before the sanders could be put on the locomotive, however, air nozzles had to be built. They were formed simply and quickly by using weatherhead 1/8 inch brass ball solderless type tubing elbows and 8-32 steel machine screws with their heads cut off. The elbows used have a male pipe thread on one end and a tubing fitting on the other.
The 1 inch long screws were drilled through with a 1/16 inch drill for the passage of air. Then the ends were ground to a blunt point. The pipe thread end of each brass elbow was tapped out to an 8-32 thread as deep as the tap would go. About 1/4 inch of this end of each fitting was then cut off to eliminate unnecessary material. The pipe threads were ground off to improve appearance.
After the hollow steel screws were inserted in the brass elbows, blunt ends in, each assembly was screwed into the threaded hole of a sander trap. Any nozzle extending beyond the center of the vertical 3/8 inch inlet hole was cut off to the correct length. Then they were soldered to the brass elbows and the excess solder filed off. The nozzle assemblies were then complete and were installed once again in the traps.
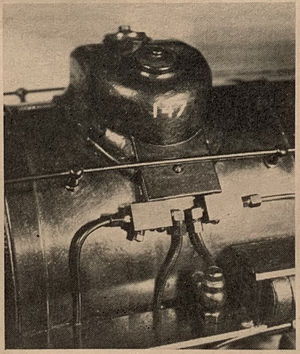
The sanders were installed on the sides of the locomotive boiler by soldering them to the 3/8 inch copper tubing pipes extending down from the dome. The control valves were located conveniently on the floor of the cab on the fireman's side and the needle valve underneath the floor, out of the way. One-eighth-inch copper tubing was used for all lines in the air and sand systems. Steel tubing might last longer in the sand lines, but it is too difficult to bend during the installation.
In actual service, the TLS sanders work just like full size sanders, delivering a fine, almost invisible stream of sand to the rails. The dome needs refilling very seldom.
The last step in the installation was to cover up the sand inlet pipes, between dome and sanders, with two pieces of aluminum sheet custom tailored to a tight fit. This hides the 3/8 inch tubing and improves the appearance of the locomotive.
What sand is best to use? The Tipsico Lakeshore went to the Grand Trunk Western Railroad's Pontiac, Michigan roadhouse and got a sackful of their sand. It is fine, non-sharp sand which flows easily.
Should the sanders plug up, the easiest way to clear them, T.L.S. engineers found, is to blow them out with the air supply while covering the end of the affected outlet pipe. This causes a backward flow of air into the dome, loosening any packed sand. But most of the time, the warmth of the boiler will heat the sand so that it will not cake up.

