Rivets: Difference between revisions
No edit summary |
|||
| (15 intermediate revisions by the same user not shown) | |||
| Line 2: | Line 2: | ||
[[File:Riveting.svg|thumb|right|300px|Setting small rivets manually.]] | [[File:Riveting.svg|thumb|right|300px|Setting small rivets manually.]] | ||
== Suggestions == | |||
From livediesel@yahoogroups.com, May 2013: | From livediesel@yahoogroups.com, May 2013: | ||
| Line 8: | Line 10: | ||
** MCC uses 3/32" rivets typically 3/8" or 5/16" long. I have found that http://www.aircraft-tool.com/ has the best prices for rivets and rivet related items. | ** MCC uses 3/32" rivets typically 3/8" or 5/16" long. I have found that http://www.aircraft-tool.com/ has the best prices for rivets and rivet related items. | ||
* Bill Koster wrote: | * [[Bill Koster]] wrote: | ||
** I have used #2 drive screws to simulate rivets. Though oversize, they give a good appearance. Their head is about the same size as a 2-56 round head screw, but without the slot. | ** I have used #2 drive screws to simulate rivets. Though oversize, they give a good appearance. Their head is about the same size as a 2-56 round head screw, but without the slot. | ||
| Line 19: | Line 21: | ||
** For the stake pockets on a flat car I used #6 finishing nails; small holes and cut in back leaving 1/8 inch exposed, two blows with hammer and nail set to flatten the head and then touched the back w/wire welder. Looks and holds well. | ** For the stake pockets on a flat car I used #6 finishing nails; small holes and cut in back leaving 1/8 inch exposed, two blows with hammer and nail set to flatten the head and then touched the back w/wire welder. Looks and holds well. | ||
* Bruce Mowbray wrote: | * [[Bruce Mowbray]] wrote: | ||
** I used 3/32 rivets with a .130" diameter head brass rivets for my tender. This scales out to a 3/4" diameter head. Typical for tank work on full sized locomotives. I didn't use Clecos as I don't feel that they hold things tight enough. Instead, I used #3-48 allen head cap screws and nuts. They fit the holes tightly and didn't take up as much room in the work zone as the Clecos. A box of 500 screws was $8.99 at [http://www.mscdirect.com | ** I used 3/32 rivets with a .130" diameter head brass rivets for my tender. This scales out to a 3/4" diameter head. Typical for tank work on full sized locomotives. I didn't use Clecos as I don't feel that they hold things tight enough. Instead, I used #3-48 allen head cap screws and nuts. They fit the holes tightly and didn't take up as much room in the work zone as the Clecos. A box of 500 screws was $8.99 at [http://www.mscdirect.com MSC]. I had the nuts laying around. | ||
== Video == | |||
'''Four Methods of Flush Riveting''', <i>Walt Disney Studios</i> | |||
<youtube>IDbTUt3OG9s</youtube> | |||
<br><br> | |||
'''Installing Aircraft Solid Rivets''' | |||
<br> | |||
<youtube>1hB3rIECtxM</youtube> | |||
<br> | |||
== Blind Holes == | |||
Tight Rivets in Blind Holes, from [https://archive.org/details/popularmechanic00unkngoog "Popular Mechanics Shop Notes for 1921"]: | |||
: The sketch shows how a rivet can be fastened securely in a blind hole. Before the rivet is inserted, a hole is bored in its end, and a steel ball dropped into the blind hole. When the rivet head is hammered, the ball is forced into the hole in the rivet, expanding the latter and seating it firmly. | |||
[[File:TightRivetInBlindHole PopularMechanicsShopNotes1921.jpg|thumb|center|200px]] | |||
== Rivet tape == | |||
Doug Blodgett shared the following: | |||
: My rivet tape arrived today. With about 1100 rivets to install on this [[Precision Steel Car|PSC]] boxcar, I decided to try some rivet tape to speed things up. It "works a treat" as my British friends would say. Here are a couple of photos showing how it works. Basically it lets you pre-install the rivets, cover them with a special tape, and then rivet them at one sitting without having to stop each time to install another one. | |||
<gallery widths="300px" heights="300px" perrow="2"> | |||
File:DougBlodgett rivet tape 1.jpg|This is the roll of rivet tape. The green part is adhesive and the clear part is, well, not adhesive. | |||
File:DougBlodgett rivet tape 2.jpg|Here I am installing all the rivets on one panel. The blue tape is to keep me from installing rivets where they don't go just yet. The top row of rivets has already been taped. | |||
File:DougBlodgett rivet tape 3.jpg|Installing the tape. It's very thin. Only the green part is adhesive so the rivet is sitting under the clear part. Easier to see and no residue after setting the rivets. | |||
File:DougBlodgett rivet tape 4.jpg|This is the backside of the panel before bucking the rivets. Without the tape, these would all fall out as soon as you set the first rivet. | |||
File:DougBlodgett rivet tape 5.jpg|Here you can see that the rivet set goes right over the tape when bucking. Tape is peeled off each row as it is finished. Using the tape makes the process go incredibly fast with a lot less effort. I got the tape from [http://www.aircraft-tool.com/shop/detail.aspx?PRODUCT_ID=685-1 Aircraft Tool Supply Company]. | |||
</gallery> | |||
== External Links == | == External Links == | ||
| Line 27: | Line 62: | ||
* [http://www.chaski.org/homemachinist/viewtopic.php?f=8&t=101201 "Riveting with SS rivets", <i>Chaski.org</i>] | * [http://www.chaski.org/homemachinist/viewtopic.php?f=8&t=101201 "Riveting with SS rivets", <i>Chaski.org</i>] | ||
* [http://www.rivetsinstock.com/rivets/solid-rivets/small-solid-rivets/round-head-solid-rivets.html Solid Rivet Size Chart] | * [http://www.rivetsinstock.com/rivets/solid-rivets/small-solid-rivets/round-head-solid-rivets.html Solid Rivet Size Chart] | ||
* [http://www.chaski.org/homemachinist/viewtopic.php?f=8&t=102086&sid=34160f47e6a2175e6ae78d93c021311b "Rivets", <i>Chaski.org</i>] | |||
* [http://www.aircraft-tool.com/shop/detail.aspx?PRODUCT_ID=685-1 Riveter's Tape 3/4 inch wide, <i>Aircraft Tool Supply Company</i>] | |||
* [http://www.chaski.org/homemachinist/viewtopic.php?f=8&t=103312 "Riveting", <i>Chaski.org</i>] | |||
* [http://www.chaski.org/homemachinist/viewtopic.php?f=8&t=81401 "Riveting the tender", <i>Chaski.org</i>] | |||
* [http://www.discoverlivesteam.com/articles/121-2/ "Hopper Car Build", <i>DiscoverLiveSteam.com</i>] | |||
* [https://www.chaski.org/homemachinist/viewtopic.php?f=8&t=106799 "The Start of Riveting a Tender Tank in 3/4 inch Scale", <i>Chaski.org</i>] | |||
Latest revision as of 11:20, 17 April 2023

Suggestions
From livediesel@yahoogroups.com, May 2013:
- JP wrote:
- MCC uses 3/32" rivets typically 3/8" or 5/16" long. I have found that http://www.aircraft-tool.com/ has the best prices for rivets and rivet related items.
- Bill Koster wrote:
- I have used #2 drive screws to simulate rivets. Though oversize, they give a good appearance. Their head is about the same size as a 2-56 round head screw, but without the slot.
- Jimi wrote:
- Are you looking for scale rivets ? For small rivets, try using the heads of common pins. (Raid your wife's sewing box.) Of course they can't be used to hold two pieces of steel together, but they look nice.
- Weld the steel at the joints to hold the pieces together. Then drill a very small hole to insert a pin and cut the excess off the back. If you have a good welder (TIG) tack weld the pin from the backside.
- For a rivet a little bigger, look in the nail aisle at Home Depot and buy some brads with rounded heads. Drill, insert, cut and tack weld from the back. It worked great on the cow catcher I built.
- Laurence Johnson wrote:
- For the stake pockets on a flat car I used #6 finishing nails; small holes and cut in back leaving 1/8 inch exposed, two blows with hammer and nail set to flatten the head and then touched the back w/wire welder. Looks and holds well.
- Bruce Mowbray wrote:
- I used 3/32 rivets with a .130" diameter head brass rivets for my tender. This scales out to a 3/4" diameter head. Typical for tank work on full sized locomotives. I didn't use Clecos as I don't feel that they hold things tight enough. Instead, I used #3-48 allen head cap screws and nuts. They fit the holes tightly and didn't take up as much room in the work zone as the Clecos. A box of 500 screws was $8.99 at MSC. I had the nuts laying around.
Video
Four Methods of Flush Riveting, Walt Disney Studios
Installing Aircraft Solid Rivets
Blind Holes
Tight Rivets in Blind Holes, from "Popular Mechanics Shop Notes for 1921":
- The sketch shows how a rivet can be fastened securely in a blind hole. Before the rivet is inserted, a hole is bored in its end, and a steel ball dropped into the blind hole. When the rivet head is hammered, the ball is forced into the hole in the rivet, expanding the latter and seating it firmly.

Rivet tape
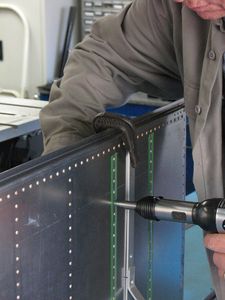
Doug Blodgett shared the following:
- My rivet tape arrived today. With about 1100 rivets to install on this PSC boxcar, I decided to try some rivet tape to speed things up. It "works a treat" as my British friends would say. Here are a couple of photos showing how it works. Basically it lets you pre-install the rivets, cover them with a special tape, and then rivet them at one sitting without having to stop each time to install another one.
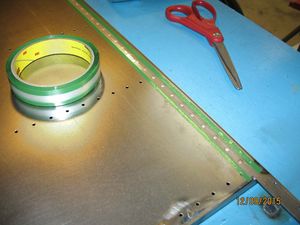
This is the roll of rivet tape. The green part is adhesive and the clear part is, well, not adhesive.
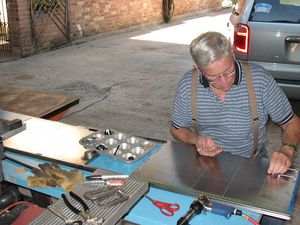
Here I am installing all the rivets on one panel. The blue tape is to keep me from installing rivets where they don't go just yet. The top row of rivets has already been taped.
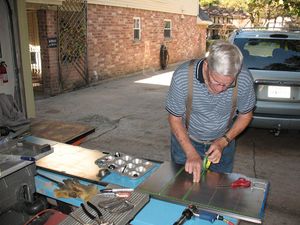
Installing the tape. It's very thin. Only the green part is adhesive so the rivet is sitting under the clear part. Easier to see and no residue after setting the rivets.
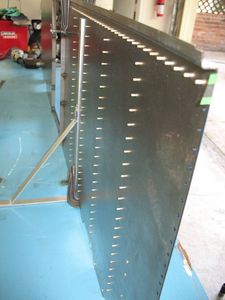
This is the backside of the panel before bucking the rivets. Without the tape, these would all fall out as soon as you set the first rivet.
Here you can see that the rivet set goes right over the tape when bucking. Tape is peeled off each row as it is finished. Using the tape makes the process go incredibly fast with a lot less effort. I got the tape from Aircraft Tool Supply Company.


External Links
- "A Riveting Article (or how to set rivets without going crazy)", DiscoverLiveSteam.com
- "Riveting with SS rivets", Chaski.org
- Solid Rivet Size Chart
- "Rivets", Chaski.org
- Riveter's Tape 3/4 inch wide, Aircraft Tool Supply Company
- "Riveting", Chaski.org
- "Riveting the tender", Chaski.org
- "Hopper Car Build", DiscoverLiveSteam.com
- "The Start of Riveting a Tender Tank in 3/4 inch Scale", Chaski.org