PSC 40 Foot Boxcar: Difference between revisions
(Created page with "Category:Construction Doug Blodgett of Houston Area Live Steamers shared his experience building a pair of Precision Steel Car 40 foot boxcar kits. <gallery widt...") |
No edit summary |
||
| Line 3: | Line 3: | ||
Doug Blodgett of [[Houston Area Live Steamers]] shared his experience building a pair of [[Precision Steel Car]] 40 foot boxcar kits. | Doug Blodgett of [[Houston Area Live Steamers]] shared his experience building a pair of [[Precision Steel Car]] 40 foot boxcar kits. | ||
<gallery | == Setup == | ||
<gallery widths="300px" heights="300px" rowsper="2"> | |||
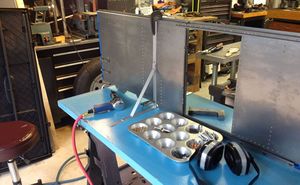
File:DougBlodgett rivet tape 6.jpg|This is the setup I use to hold the panel while I am installing rivets. Makes it easier to reach both sides at the same time - rivet gun in front and bucking bar on back side. | File:DougBlodgett rivet tape 6.jpg|This is the setup I use to hold the panel while I am installing rivets. Makes it easier to reach both sides at the same time - rivet gun in front and bucking bar on back side. | ||
File:DougBlodgett rivet tape 8.jpg|Door panels are welded up and I am getting ready to grind the plug welds and backsides of the rivets flush. The instructions don't say anything about this but if you don't the door won't slide in it's tracks. | File:DougBlodgett rivet tape 8.jpg|Door panels are welded up and I am getting ready to grind the plug welds and backsides of the rivets flush. The instructions don't say anything about this but if you don't the door won't slide in it's tracks. | ||
| Line 21: | Line 23: | ||
File:DougBlodgett rivet tape 4.jpg|This is the backside of the panel before bucking the rivets. Without the tape, these would all fall out as soon as you set the first rivet. | File:DougBlodgett rivet tape 4.jpg|This is the backside of the panel before bucking the rivets. Without the tape, these would all fall out as soon as you set the first rivet. | ||
File:DougBlodgett rivet tape 5.jpg|Here you can see that the rivet set goes right over the tape when bucking. Tape is peeled off each row as it is finished. Using the tape makes the process go incredibly fast with a lot less effort. I got the tape from [http://www.aircraft-tool.com/shop/detail.aspx?PRODUCT_ID=685-1 Aircraft Tool Supply Company]. | File:DougBlodgett rivet tape 5.jpg|Here you can see that the rivet set goes right over the tape when bucking. Tape is peeled off each row as it is finished. Using the tape makes the process go incredibly fast with a lot less effort. I got the tape from [http://www.aircraft-tool.com/shop/detail.aspx?PRODUCT_ID=685-1 Aircraft Tool Supply Company]. | ||
== See also == | |||
* [[Precision Steel Car]] | |||
* [[Rivets]] | |||
== External Links == | |||
* [http://discoverlivesteam.com/magazine/204/index.htm "Building the Precision Steel Car Boxcar Kit", <i>DiscoverLiveSteam.com</i>] | |||
* [http://www.islandpondrailroad.com/trains/boxcar/boxdex.htm 40 Foot Boxcar Kit Build Log] | |||
Revision as of 19:44, 1 January 2016
Doug Blodgett of Houston Area Live Steamers shared his experience building a pair of Precision Steel Car 40 foot boxcar kits.
Setup
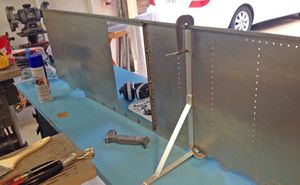
This is the setup I use to hold the panel while I am installing rivets. Makes it easier to reach both sides at the same time - rivet gun in front and bucking bar on back side.
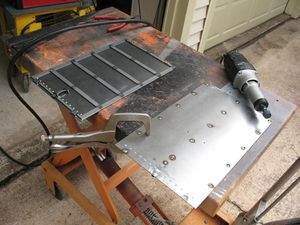
Door panels are welded up and I am getting ready to grind the plug welds and backsides of the rivets flush. The instructions don't say anything about this but if you don't the door won't slide in it's tracks.
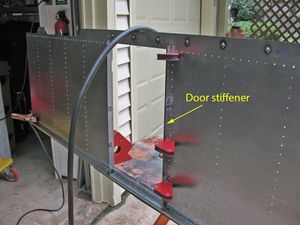
Getting ready to weld in door stiffener on panel.
I turned the diameter of the tip of this rivet set to a smaller size so it would fit under the lip formed in the top of the side panel. Before I had to hold it at an angle to the head of the rivet which produces "smileys" on the panel. Not good
There are about 1100 rivets that have to be installed just for looks as well as hold a lot of stuff together.


Riveting
My rivet tape arrived today. With about 1100 rivets to install on this PSC boxcar, I decided to try some rivet tape to speed things up. It "works a treat" as my British friends would say. Here are a couple of photos showing how it works. Basically it lets you pre-install the rivets, cover them with a special tape, and then rivet them at one sitting without having to stop each time to install another one.
<gallery widths="300px" heights="300px" rowsper="2"> File:DougBlodgett rivet tape 1.jpg|This is the roll of rivet tape. The green part is adhesive and the clear part is, well, not adhesive. File:DougBlodgett rivet tape 2.jpg|Here I am installing all the rivets on one panel. The blue tape is to keep me from installing rivets where they don't go just yet. The top row of rivets has already been taped. File:DougBlodgett rivet tape 3.jpg|Installing the tape. It's very thin. Only the green part is adhesive so the rivet is sitting under the clear part. Easier to see and no residue after setting the rivets. File:DougBlodgett rivet tape 4.jpg|This is the backside of the panel before bucking the rivets. Without the tape, these would all fall out as soon as you set the first rivet. File:DougBlodgett rivet tape 5.jpg|Here you can see that the rivet set goes right over the tape when bucking. Tape is peeled off each row as it is finished. Using the tape makes the process go incredibly fast with a lot less effort. I got the tape from Aircraft Tool Supply Company.