Fabricating Box End Wrenches: Difference between revisions
No edit summary |
|||
| (One intermediate revision by the same user not shown) | |||
| Line 22: | Line 22: | ||
P.S. Don't use socket head set screws because they are very hard. | P.S. Don't use socket head set screws because they are very hard. | ||
== Make Your Own Wrench == | |||
<i>[[The North American Live Steamer]]</i>, Volume 1, Number 2, 1956 | |||
This makes a good little open end wrench for small nuts and bolts. Start with a flat piece of cold rolled or tool steel and lay out as in Figure 1. The opening in the ends can be straight or at an angle. Next, center punch both ends slightly off center toward the opening, and drill with a drill slightly smaller than the diameter of the bolt or nut which you want the wrench to fit. Now your wrench should look like Figure 2. File or saw away the shaded part in Figure 3, being very careful when you file in the jaws. | |||
Next, round off all the edges except the jaws. This wrench should be [[Case hardening|hardened]]. If it's tool steel, heat to a bright red and drop in cold water and let it cool (see [[Hardening and Tempering Colors]]). Polish with fine emory cloth and heat again until it turns blue and let cool. This draw some of the temper. If it's cold rolled steel, temper with [[Case hardening|Casenit]], following the instructions on the can. | |||
<gallery widths="100px" heights="500px> | |||
File:MakeYourOwnWrench Figure1.jpg|Figure 1 | |||
File:MakeYourOwnWrench Figure2.jpg|Figure 2 | |||
File:MakeYourOwnWrench Figure3.jpg|Figure 3 | |||
File:MakeYourOwnWrench Figure4.jpg|Figure 4 | |||
</gallery> | |||
Latest revision as of 23:51, 14 January 2015

by Walter W. Warder
The North American Live Steamer, March 1956
Here is how I make box end wrenches from socket head cap screws. First, I take two screws of the size I want and chuck them in the lathe and turn the head down some as in Figure 1. This gives you a thin box end and will work in tight places. Next, I take the parting tool and cut off a ring about the thickness of the nut or bolt head which the wench will fit. Next, I file a piece of metal for the handle as in Figure 3, and braze the little rings to the ends of this.
Next, bend the handle a little at each end to offset the heads as in Figure 4. To finish, I round the edges of the handle and polish with fine emory cloth. This makes a very neat little box end wrench. I don't think a wrench of this type needs to be case-hardened, as they seem plenty strong.
P.S. Don't use socket head set screws because they are very hard.
Make Your Own Wrench
The North American Live Steamer, Volume 1, Number 2, 1956
This makes a good little open end wrench for small nuts and bolts. Start with a flat piece of cold rolled or tool steel and lay out as in Figure 1. The opening in the ends can be straight or at an angle. Next, center punch both ends slightly off center toward the opening, and drill with a drill slightly smaller than the diameter of the bolt or nut which you want the wrench to fit. Now your wrench should look like Figure 2. File or saw away the shaded part in Figure 3, being very careful when you file in the jaws.
Next, round off all the edges except the jaws. This wrench should be hardened. If it's tool steel, heat to a bright red and drop in cold water and let it cool (see Hardening and Tempering Colors). Polish with fine emory cloth and heat again until it turns blue and let cool. This draw some of the temper. If it's cold rolled steel, temper with Casenit, following the instructions on the can.
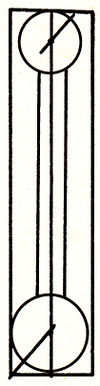
Figure 1
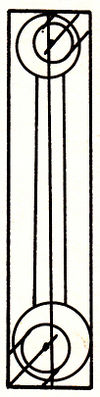
Figure 2

Figure 3
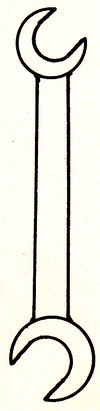
Figure 4


