Let's Build a Boiler for the 3/4 inch Scale Beginner's Locomotive
Let's Build a Boiler for the 3/4 inch Scale Beginner's Locomotive
Victoria Society of Model Engineers
The Miniature Locomotive, May-June 1954
Having the running gear all fixed up to run on air to your satisfaction you will now be wanting the fog maker. This is a straightforward job with no intricate double or reverse flanging to do.
At the present time there is a diversity of method which resolves itself into the problem of "to flange or not to flange." That is the question. No doubt a boiler with un-flanged plates is easier and quicker to build. Also, if an un-flanged boiler is properly bronze-welded it will hold until the plate tears. A flanged boiler not so perfectly brazed will be as strong as the best non-flanged but perfectly welded boiler, so making allowances for inexperienced brazers I specify flanged plates in all but two places. Now I must say here that because a man is a perfectly good welder by trade it does not mean he'll be qualified to braze up a miniature locomotive boiler. This type of brazing is more like soldering with brazing alloys instead of lead-tin solder. The whole joint therefore must come up to the flowing pointer (heat) of the brazing rod. It will then flow right through the joint bonding it all the way. If you only heat the joint up to the plastic state you will get no penetration at all and a weak joint. Of course don't go all out on heat so the boiler looks like it has been through "Dante's Inferno." There is a happy medium and you can get it by using a very large tip on the torch and keeping the little blue cone over 1-1/2 inches away. If you don't get enough heat then you need a larger tip or assistance by heat from a large blow torch to take care of the radiation losses. That's the secret of brazing boilers.
I've told you about this first so you can think it over while you are getting the boiler ready for brazing.

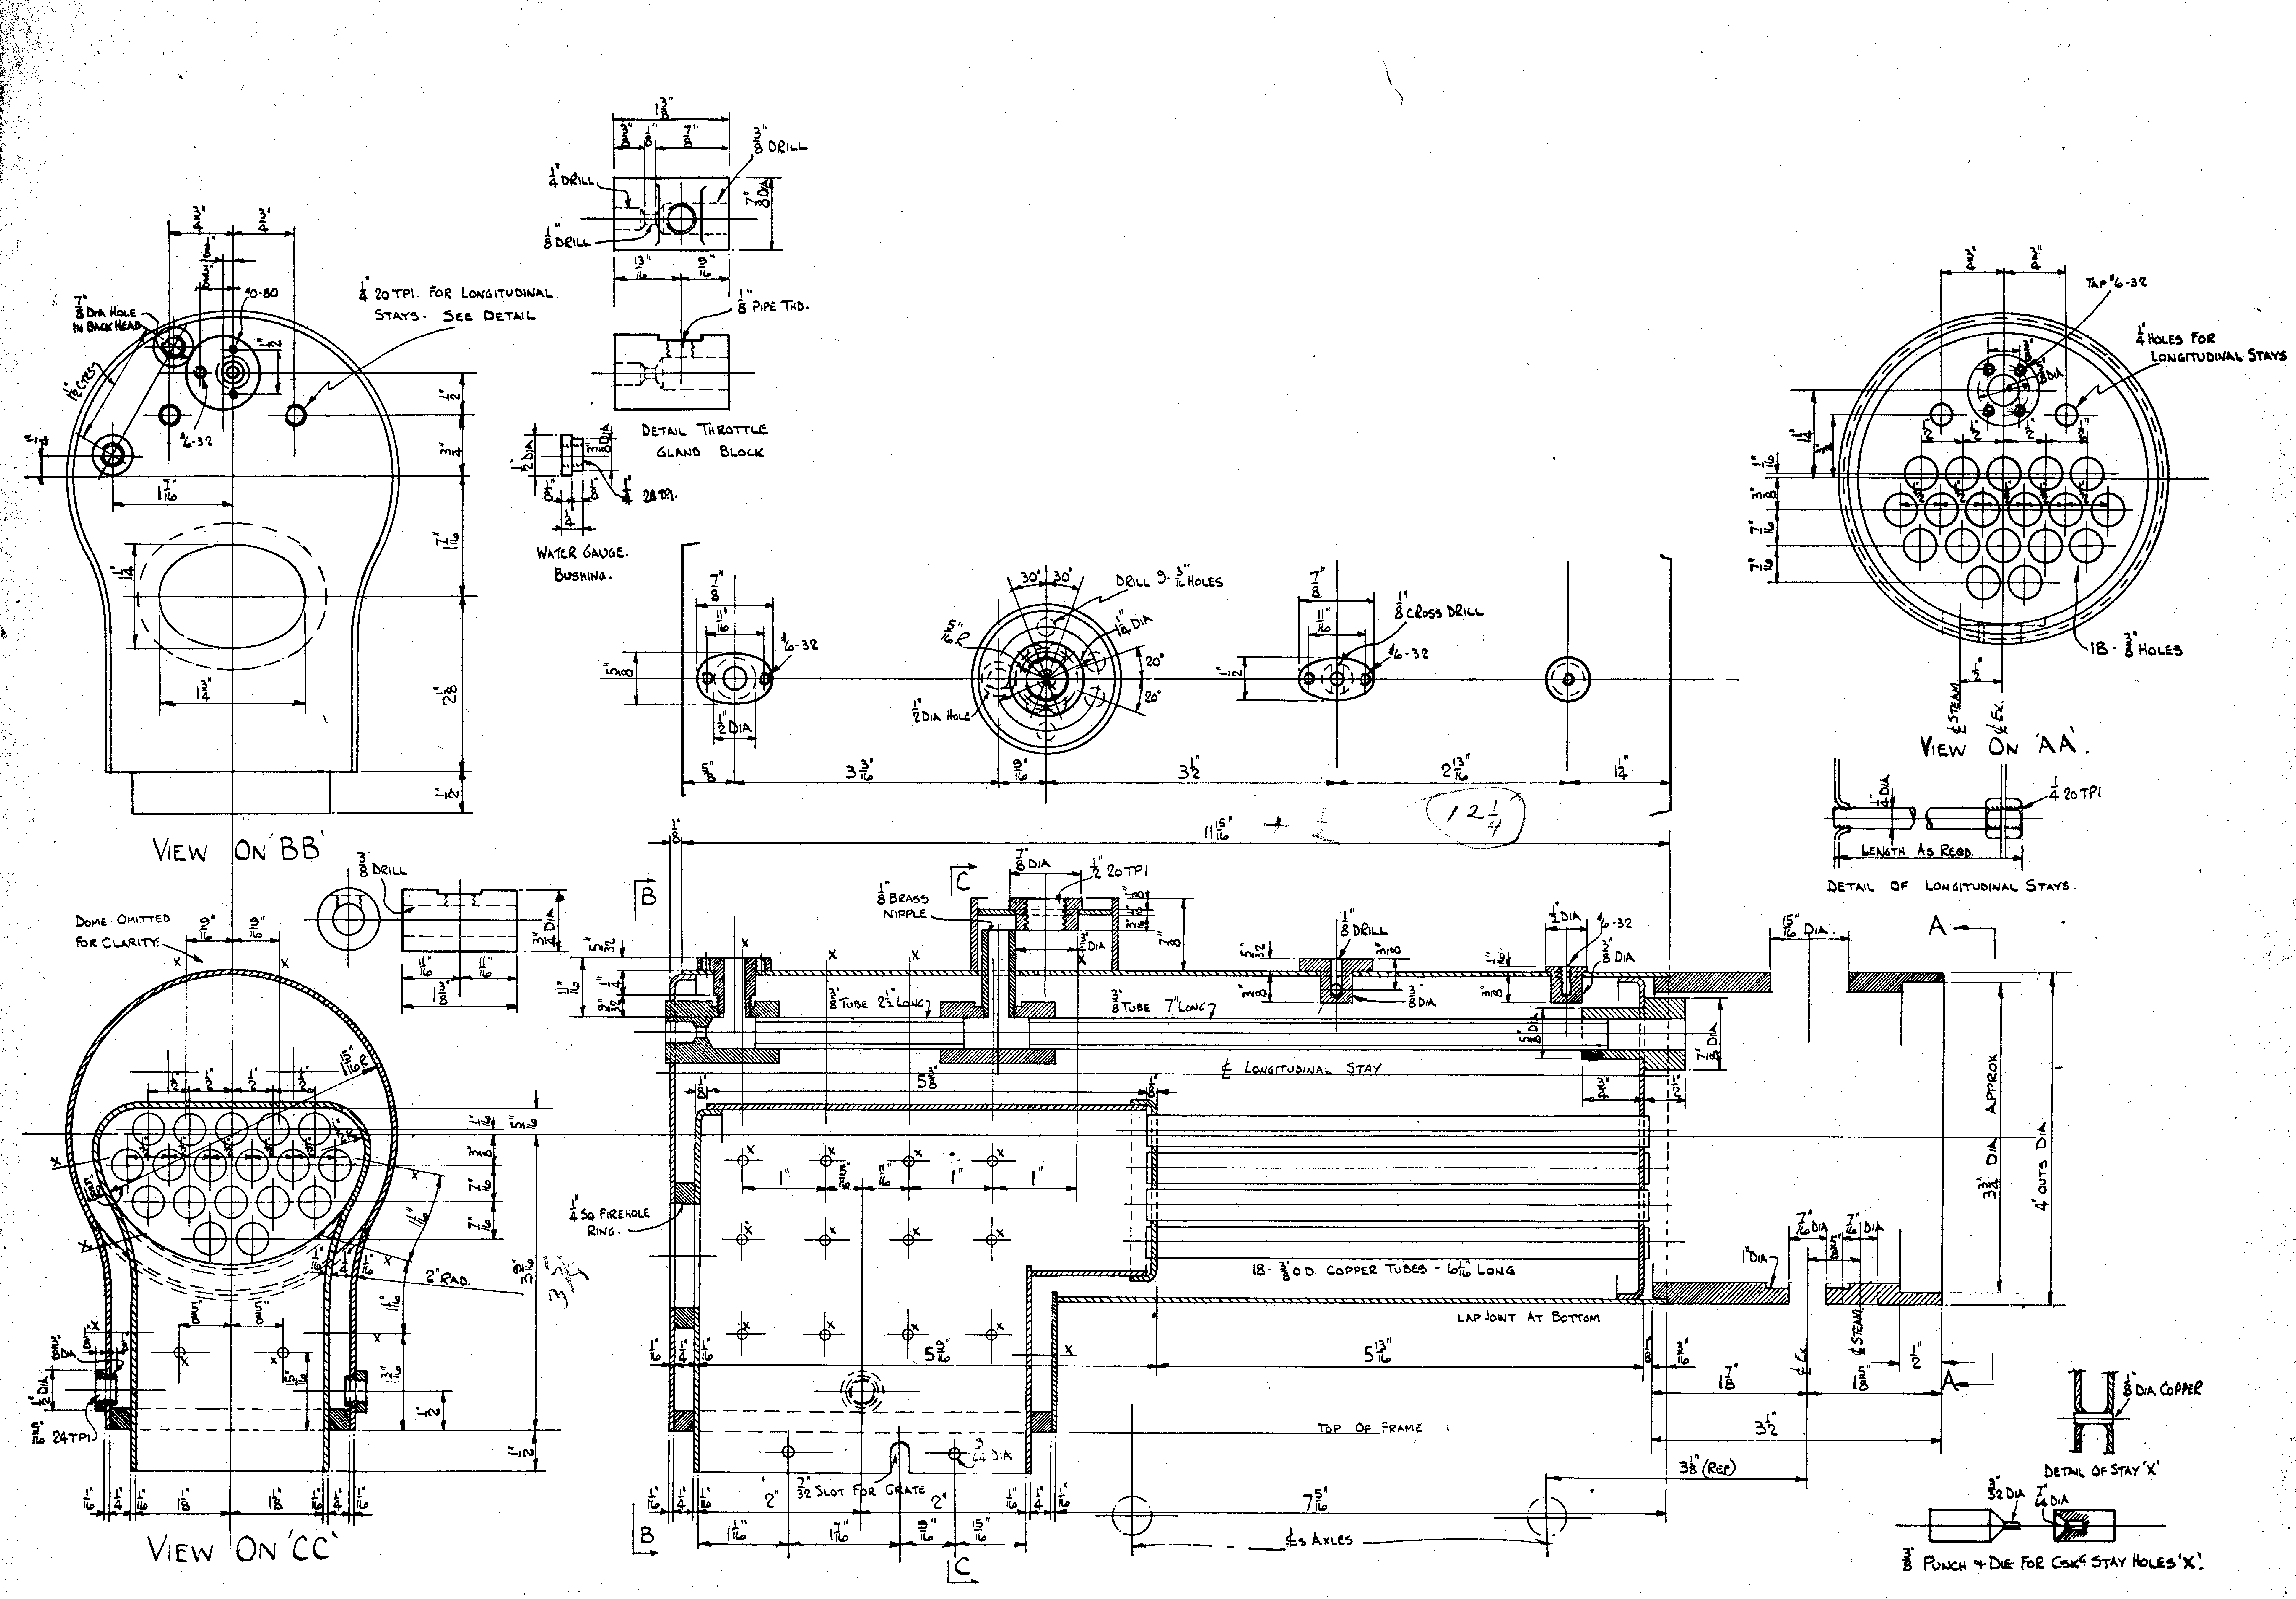
Now to the boiler construction proper. I am of the firm opinion that the time is well spent making a wood form to shape the boiler shell.
Some may think that a combustion chamber is useless on such a short boiler or adds to the work of building, but from my own experience it is an aid to the construction. It allows the tubes to be brazed into the tube sheets at each end first while you can get at them and haven't too much copper to heat up. The tube assembly is then brazed onto the combustion chamber.
Bend some heavy paper around the form and cut it to use as a pattern allowing 1/2 inch at the bottom for the lap seam. Ditto the firebox. Cut patters also for the backhead, door sheet, throat plate, inner fire box, throat plate and the two tube sheets allowing 1/4 inch all around where it is to be flanged. You can lay all of these patterns on the copper sheet like a jig saw puzzle and cut to the best advantage.
You'll need six formers to flange the plates over and these can be cut from 1/4 inch steel plate. One for the back head, one for the door sheet, one for the throat of the fire box, one for the throat of the shell, one for the combustion chamber tube sheet and one for the front tube sheet. All except the combustion chamber tube sheet are 1/16 inch smaller all around than the inner size of the part they are to flange a plate to fit. Round off the sharp corners so as not to cut the plate when flanging.
The combustion chamber tube sheet is flanged to fit over the combustion chamber so the former plate is cut 1/16 inch larger all around than the firebox form block. You may find it a help to cut the fire hole in the backhead former plate.
Now cut out the flanged plates from 1/16 inch copper and annea (soften) them by heating to a fairly bright red and dunking them in a bucket of cold water. Put a plate and its former together, center it up and hold with a small clamp in one corner. Put the works in the vise with a short portion to be flanged above the jaws. A rawhide or plastic hammer is best for beating over the plate. Failing these a wood mallet, and if you promise not to tell; I just use an ordinary hammer. Don't beat the daylights out of it in the first round but bring it to about a 45 degree angle then turn to a new hoodl and bring some more down until it is all down to 45 degree all around. Re-anneal as before and by the same process bring it right down to the former plate. Quit when you've reached the former as you don't want to stretch the flange and thin it out.
Flange up all the plates. The two throat sheets are curved to fit against the barrel part of the shell form and the bottom of the combustion chamber of the firebox form. These joints don't require flanging as one can run such a good fillet of brazing onto them.
With the shell sheet balanced over the shell form, fold down each side. Just shove it around until the firebox sides touch the form and pull the barrel portion around until they overlap. Put some hay wire around in a couple of bands and keep twisting it up while tapping it with a stick of wood you can draw the barrel around perfectly snug. To reverse curve the sides of the firebox take any round piece of wood or 1-1/4 inch pipe will do; lay it lengthways of the boiler and wallop it in the middle. You'll find it will lay the copper into the form as nice as you please. Put a protecting piece of wood over each side and a carpenter's clamp will hold the sides in tight. Try the back head in; with only average care it should fit snug. Now put in the throat plate. It fits inside the end of the shell sheet. With it held in place on the form, drill two 3/32 inch rivet holes on each side and drill about four 3/32 inch holes along the shell lap seam. Now undo all clamps and remove from the form. Clean all the joints and paint them with easy flow flux and rivet up. You can now practice the gentle art of brazing. Stand the boiler on end, barrel up; with a big brisky flame heat up the shell and throat plate to a medium red. Apply easy flow to one corner of the throat plate joint when it should melt and run like water. work the fire along until you come to the shell then follow around the shell and back down the other side. Lay the shell on its back with the lap seam over to one side a little so the braze will run in. Starting where it is now hottest, flow in the wire as before but be sure both the inside and outside of the joint is dull red or naturally the braze won't flow through before it hardens. If you can see the braze has come through you need have no fears as to safety. Dunk in water as soon as it has lost its redness.
The firebox is bent up just the same and rivet holes drilled. Put six rivets in the door sheet and drill the lap seam of the combustion chamber for two rivets but have the tube sheet in place over it while drilling. Braze up as before but don't braze the tube sheet on. Give each rivet head a touch of braze as the heat may loosen them.