Injector

An injector, ejector, steam ejector, steam injector, eductor-jet pump or thermocompressor is a type of pump. There are two varieties of injector, non-lifting and lifting.
The non-lifting injector cold water input is fed by gravity. It uses the principle of induced current to push water up to the boiler check valve. It avoids the premature boiling of feed water at very low absolute pressure, by avoiding the Venturi effect. The steam cone minimum orifice diameter is kept larger than the combining cone minimum diameter. The non-lifting Nathan 4000 injector used on the Southern Pacific 4294 could push 12,000 gallons per hour at 250 psi.
The lifting injector uses the Venturi effect of a converging-diverging nozzle to convert the pressure energy of a motive fluid to velocity energy which creates a low pressure zone that draws in and entrains a suction fluid. After passing through the throat of the injector, the mixed fluid expands and the velocity is reduced which results in recompressing the mixed fluids by converting velocity energy back into pressure energy. The motive fluid may be a liquid, steam or any other gas. The entrained suction fluid may be a gas, a liquid, a slurry, or a dust-laden gas stream.
- A lifting injector will draw water up the water pipe to above the water level of the tender. These can be mounted boiler-side.
- A non-lifting injector needs the water at the injector at time of starting, it will not start with air in the tube nor will they draw water, hence they are down below the cab floor where there is always positive pressure on the water delivery side.
Care and Feeding
- For injectors in general let me pass on some infomation that my old friend Emery Ohlenkamp told me.(and he was about as good as it gets when it comes to injectors):
- Injectors do not like heat.
- The finer the filter on the water side, the longer the injector will work properly. (no screen means maybe one run IMHO and a screen on the filler tube is NO protection from tank degenerating products ie rust).
- No sharp bends in the line
- Volume control of water is required for most efficient operation.
- Always start water flow first (tough if you want to lift ??) a dribble is not a supply.
- Remember, an injector is a kinetic machine..it works through energy transfer and that means fast flows and controlled temperatures
Manufacturers
Superscale

Ohlenkamp
See Emery Ohlenkamp
Eccentric Engineer

John Cashmore
- I have been told by several chums in the UK that the injectors by Chiverton and John Cashmore ("JC") are the ones to have and are as reliable as any. I heard some time ago that Cashmore was trying to retire and was producing fewer injectors so I picked up a couple through Polly. I've always wanted to try my hand at making a few myself though.

Kennion Brothers
- Kennion Brothers were a major supplier in the U.K. for many years, and I believe Coles got a lot of their stock from them. Here's the injector description from a 1977 Kennion Brothers catalog.
- Charles Kennion died 15 or 20 years ago (about 1987) and the firm closed. Another U.K. supplier took over the line of castings.
- I was able to visit the shop about 30 years ago (about 1977) while I was living in England. Hundreds of bins and racks of castings and bits and pieces in a space about the size of an average house.

Construction
Just Do It
Don't be shy. Get out there and have a go at making your own injectors. They are not hard to make. Well, not to me anyway, as I was making them comercially for quite a few years, just time consuming. Regardless of that, they are not hard to make! I speak from experience. My first injector didn't work, so I sat around for a few hours wondering why. That evening I had a look through my spreadsheet (where all my formulae were) and noticed that I had made a mistake with one of the formulae. I corrected it, and out popped new values for the throat sizes. I made new cones, and eureka! away it went. I still had to shim the steam cone to bring the opperating range to where I wanted it. But HEY!!! I gave it a go. You can do the same, but only if you get out there and try it. Oh, I also made 2 bodies before I was happy with it as a test piece. It was NOT suitable for a loco' unless well hidden. It wasn't meant to be anything more than a test peice.
Here are some things to remember if you are designing your own.
- T5 (output temp) must be between 70 and 75°C for efficient working (and to help prevent thermal shock).
- Correct steam nozzle design will give you supersonic steam velosities (hence more bang for your buck), that most formulae don't allow for. The formulae mentioned in the injector book of 1895 don't use supersonic velosities. Most designs use subsonic nozzles, which is better for those of you who don't know how to accurately centre and drill very small holes. The drawback is that they have a much shorter operating pressure range, so a high and low pressure injector probably will be required.
- Fabicated brass bodies are perfectly OK. There are plenty of mine out there that are over 10 years old and still working perfectly.
- Combination cones are CRITICAL to an injector. They will make or break them. A 2 peice combining cone will give better performance than a 1 peice cone.
- Cone angle is important. 6° will not give you a good injector. Through my calculations, and through testing to check them, I determined the best posible angle. You will need to do some experiments yourself. Use the same angle throughout.
- All holes must be reamed. If you think carefully, you will be able to work out how to accurately ream a hole with a drill bit.
- Moving cones in or out will not increase the operating pressure range, just move it.
To give you something to work towards, here are the performance characteristics that I guarantee for my injectors;
- Starting and Dry operating pressure range (no dribble) 15 to 140psi
- Starting lift of 10' at 110psi
- Feed water temp range 5 to 45°C Dry, 45 to 55°C with overflow at 110psi (you must remember that our boiler operating pressures are limited to 100psig + 10% accumulation).
Now, I don't expect you to be able to make them to this kind of performamnce standard on the first go. I just want you to get out there and give it a go. Who cares if your first or second attempt doesn't work very well? Nobody, except you and your pride. And you should consider the first couple as test/practice pieces. You will be able to make yourself a really nice body after you have the test unit working.
Once you master the basic injector, set your sights on something with a bit more challenge, like a self adjusting injector..... Don't scoff! I have made several different sizes of them, and many have the same performance characteristics as shown above. Including full size injectors as original replacements. They automatically compensate for feed water temp, steam pressure, dryness fraction, and control the water supply rate. Once you get to that stage, you know you are into your apprenticeship.
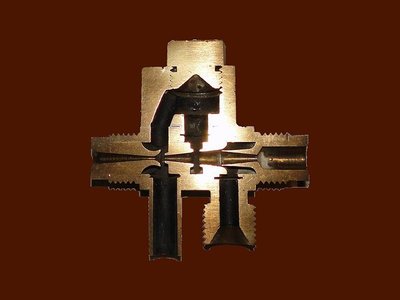
Cross section of a typical English model injector.
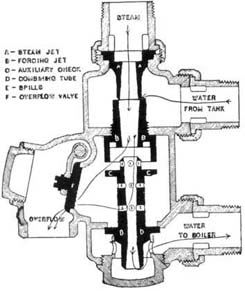
Cutaway of the Penberthy injector which was the prototype for both the Ohlenkamp and the Superscale. The American designs have a sliding washer or start valve (item C) that aids in getting the unit started.


See Also
References
- "Injector", Wikipedia
- "Ohlenkamp Injector Parts", Chaski.org
- "Fabricating an injector", Chaski.org
- "Superscale Economy Injector", Chaski.org
- "Injector Questions", Chaski.org
- The Model Injector
- Miniature Injectors Inside and Out
- "Practice and Theory of the Injector", Google Books
- Injector Construction Article by John Baguley
- Injector Calculator
- "Injectors", Catskill Archives
- "Prototype Injector Starter Valve", Chaski.org
- "Injector - Notes and Problems", Scale Model Exchange
- 3D CAD files for Feedwater Injector
- "Steam Water Feed Injectors", ModelEngineMaker.com
- "Building a Power Model Water Pump", Chaski.org
- "For sale Penberthy injector 3/8 inch", Chaski.org
- "How to size an Injector?", Chaski.org
- "Principles of Injector Operation", Deerfield & Roundabout RR