A 3/4 Scale Flat Car With Brakes
Part One
The North American Live Steamer, Volume 1, Number 7, 1956
Sooner of later in the business of live steam locomotive building, we arrive at the stage of, to use a common term, "the end of the track". This is a wonderful feeling of accomplishment, and now instead of the fun of building we are about to have some fun running. This is, of course, assuming that your engine has been run on the bench; and a few of the early teething troubles or "bugs" have been eliminated. These can be trying to the nerves, but with a little grit and determination they can be beaten one by one. That most of the engine troubles can be eliminated is true, but I have found in a few years of live-steaming that roughly about half of the most aggravating troubles do not come from the motive power department. I think that a good reason for this is the fact that the motive power is what gets into our blood and some of the less romantic things of the high iron are slighted in more than one way.
Most of us are so anxious to get behind our engine and to do some real locomotive engineering that we are apt to forget that a railroad isn't just an engine. There are a couple of other items that perhaps are not so interesting, but they are just as important. The is track. All right, we have that, (either a short one of our own or a long one that belongs to someone else) and now we need something to ride on, and that is the reason for all the for-going talk. We've all got to have a car; not just a car, but one that looks pretty good; and best of all will stay on the rails. And, I might add, do a bit of stopping when you want to.
This bit of rolling stock is not an original idea of mine. It was copied from a 1945 issue of The Model Craftsman, in an article by George Taylor. This isn't an exact copy of his car, but I think I've simplified the general design, but the basic ideas are pretty nearly as he wrote them. If my memory will serve me rightly, I think this will be a bit easier for the beginner to construct, and at the same time the performance will be good enough for the most exacting. I've noticed that a great deal of trouble comes from the fact that the cars being used are not flexible enough to handle the unevenness of the usual track, or the car being used lacks one good thing that every riding flatcar should possess --- a good brake.
As I have stated before, this design has been simplified to make it as easy a smooth working flatcar as possible, and as with most things, let's start with the basic frame construction. All the materials used in the construction of this car can be found either in the scrap box or your local steel supply house.
Cut the side and end frame sections from the correct size of angle iron. This is not too much of a job if you are fortunate enough to have a metal cutting band saw. If not, the only way to do it is to grab the hand hacksaw and do a few hard minutes of hand work. This is the rough way to do it, but when one doesn't have the luxury of power machinery, one simply has to wan it bad enough to do the hard work. I have specified the use of arc welding in the construction of this frame for two reasons. It makes a smooth job, and it is stiff. If you do not have an arc welder (I didn't), there are usually small welding shops that will do the job quickly for a reasonable price. The only requirement for this job is making sure the frame is square and the welding is good enough to allow the grinding of all the joints on the outside for a smooth looking appearance.
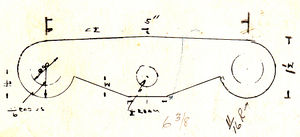
The truck side frames are cut from 1/4 inch steel plate, either with the luxury piece of equipment or by the rough saw and file method. The dimensions can be easily taken from the print of part C-6. The only change that might be necessary is the large holes on the five inch centers. This diameter is determined by the dimension of the ball bearing. The hole should be LARGER by 0.010 to 0.015 inch than the bearing. This is to allow the truck to float over the rough spots in the track, serving the purpose of a more expensive self-aligning bearing.
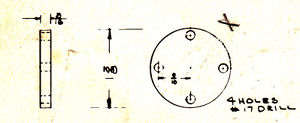
Since the bearing caps will be made sooner or later, it is just as easy now. The easiest way is to saw them from a piece of bar stock and later face them to size. They do not have to be made this thick; the reason was to improve the appearance of the truck. The four holes can be laid out, or you can make a jig. I would suggest laying one out and using it as a drill jig for the rest, and it saves time that way. After they have been drilled lay them on the truck frame and use the cover as a crill jig for spotting the tapped holes for mounting. Remember just for spotting, because you have a clearance hole in the bearing cap. After you have spotted them in on the four truck frames, drill these spots with a No. 36 drill and tap for a 6/32 inch screw. You may as well tap all the way through, as these caps go on reversely for one side. After tapping, mount the bearing caps with 6/32 hex or round head, just as you prefer, with either brass or steel. The only really important thing is to make sure they stay on.

The car bolster plate C-4 and the truck bolster C-5 are now cut to length and the holes drilled, reamed, and tapped as per the drawings. I would suggest the truck bolster plate be waured in the four-jaw chuck if a milling machine or milling attachment is not available. The car bolster may be simply sawed to size and the burrs removed. In all these drawings the critical dimensions are given in decimals and all others are in fractions. The swivel bushings are a simple lathe job, and the standard washers and hex cap screws are found at almost any hardware store. I've tried to eliminate difficult and hard to find materials.

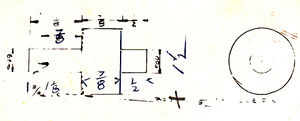
The bolster pins are a nice turning job for the lathe. You will notice the pins are slightly different, the angle at the bottom side of one will make for three point suspension, and that accounts for this type of car's ability to ride rough track. It is not too easy to sit in the center of any car with perfect balance, so I would suggest the pin with the flat shoulder be mounted in the rear. The rear of the car is determined by the position of the brake handle, so remember, when you are drilling holes for this assembly.
After finishing the car bolster plate and bolster pins you may now put them together. Simply insert the short turned end of the pin into the half-inch hole on the car bolster C-4, open the vise to allow the long end to slide in so the shoulder is taking up the shock and rivet away. Remember, now, one of these has an angle turned on it, so don't rivet with too much force. Better still, if you have a soft piece of brass or aluminum to back up the shoulder on the pin to save it from nicks.
You may now take this assembly and mount it on the car frame and at the same time mount the car seat. This is a piece of white pine cut to the dimensions given and beveled. Just make sure the sides and ends are even when mounting on the frame, although it won't operate any better, it does make the car look neater. Lay the car bolster on the underside of the frame, approximately four inches from the center of the boster pin to the end of the car. This is not a critical dimension. Now lay out the holes from the car bolster plate to the car frame and drill all the way though the car seat.
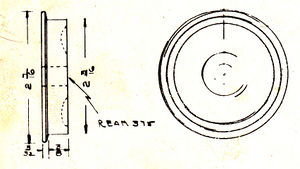
The wheels are Yankee Shop pilot wheels for the 3/4 inch scale Atlantic locomotive. They give the diameter as 2-1/4 inch finished, but I have found from experience that it comes closer to 2-3/16 inch, but the only really critical things is that all the wheels are the same diameter.
The finished dimensions can vary as to the hole size and the turned axle diameter, but just come out with a press fit. After the axles have been turned you may now press the wheels on them. This can be done in a vise, using a piece of brass tubing to press the wheel down to the shoulder of the axle. Next on the axle assembly comes a 3/8 inch washer with the bearing being pressed on the end of the turned shaft. The washer is between the wheel and the bearing.
To assemble the trucks, take a truck frame, insert a swivel bushing in the half-inch reamed hole, take a 5/16 inch cap screw with a washer, put it through the bushing and screw down tight to the truck bolster C-4. Now clamp the truck frame in a vise with the bolster pointing skyward, pick pu the axle assemblies and slide one end into the large bearing clearance holes. The bearing cap will prevent them from falling out. Now mount the other frame with the other bushing and cap screw with washer on the other end of the truck bolster and the truck assembly is ready for the mounting on the bolster pin. Notice how flexible the truck is; don't worry about the bearings turning in the clearance holes; when your weight is sitting on the cars the bearings will turn in the races. The next step is to mount the trucks on the bolster pins, and this is easily done with a flat washer and a cotter pin. Be sure you do not get them on upside down, with the car upside down the sharply angled cuts on the truck frame should be looking up.
At this stage your car will roll, and you can ride it, but of course you must mount some sort of a coupling; and the reason I left this out is because there seems to be a wide variation in coupler height. Then too, some prefer the simple link and pin while others like the more realistic type. This is a matter for you to decide, and that is the reason I have not touched it. I used the link pin, with steel 10/32 with locking nuts as the pins, as a locomotive pulling hard and becoming uncoupled can inflict havoc on people and equipment.
Part Two
The North American Live Steamer, Volume 1, Number 8, 1956
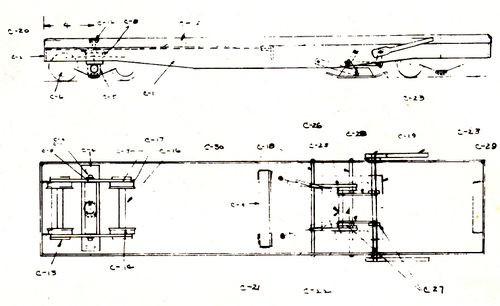
The brake rigging is probably the foggiest on the drawings, and it is a simple matter of straight links and shafts working as a matter of levers and toggles. This brake works off the track, which I think is easier to construct than one using shoes; and personally I like it better. The making of parts in the brake assembly are pretty much self-explanatory from the drawings, but I think the difficult part is the assembly itself. The action is simple; the toggle bars working as a knee joint, and as they straighten out they force the brake shoe down hard on the rail. In fact, the operator is attempting to lift himself by his bootstraps, or rather his brake shoe. When the brake handle is released, the spring pulls back on the knee joint and the shoe lifts from the rail. A good stout spring, such as a screen door spring cut to the proper length will do the job.
In the drawing of the bottom of the car, (and I think in the small size of the drawing it might be a little difficult to see) shafts C-18 and C-22 are exactly in line. Also the gear has been drawn in solid lines rather than dotted for clarity.
To assemble this brake gear, assuming that all the parts have been made, take shaft C-21 and slide parts from the inside out in this order: First the Reach Bar C-28, then two toggle bars C-27; then a 1/4 inch flat washer and last a cotter pin. Remember this is the order from the inside out and be sure to put on each set for each side. Take a shaft C-18 and insert the two inside toggle bars of the assembly that you have just made and fasten the complete unit, as you now have it in line with the middle holes you have drilled in the frame for the brake assembly. You can fasten this with round head machine screws or hex, if you care to.
Now take the other C-18 shaft and slide the two C-26 brake shoe supports on and faten this with machine screws in the two rear holes you have drilled in frame for the brake assembly. The other shaft left is C-19, the brake handle shaft, so slide this through the holes on the reach bar C-28 and then slip two levers C-27 one each on the outside of the reach bars. These levers will be pinned with 3/32 inch pins after you position them. The brake shoe assembly should be completed by this time, and that is ready to be put in position; so take shaft C-22, slip in one side of the shoe assembly then through the toggle on either side; slide the spacer C-30 in next, the toggle on the other side and then the hole on the other side of the brake shoe. A flat washer and a cotter on each end will hold them fast.
The return spring is fitted to the center shaft C-21 in the completed unit and you can drill two holes in the frame to fasten the spring. Only enough tension is required to lift the shoe free from the rail and keep it in the up position, so be sure to make it the right length. The levers C-27 and the brake handle C-23 are ready to be pinned. Simply make sure the brake handle is in the correct position before you pin it, and this is largely a matter of where you want it. Just make sure it is easy to get at. I used 3/32 inch groove pins, drilling with a 3/32 inch drill. If you don't have these, drill the holes and turn the pins a little larger, about 0.002 inch for a nice drive fit.
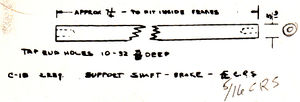
Support Shaft - Brake, C-18, 2 required, 5/16 inch diameter CRS.
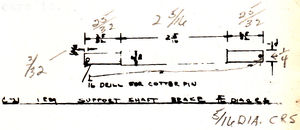
Support Shaft - Brake, C-22, 1 required, 5/16 inch diameter CRS.
Support Shaft - Brake, C-21, 1 required, 5/16 diameter inch CRS.
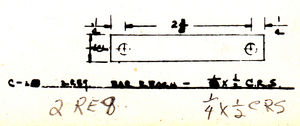
Reach Bar, C-28, 2 required, 1/4 x 1/2 inch CRS.
Spacer, C-30, 1 required, CRS.
Support Shaft - Brake, C-23, 1 required, 5/16 inch diameter CRS
Handle - Brake, C-24, 2 required, 1/4 x 3/4 inch flat CRS.

